Toolkit Extra - Advanced Possibilities
This tutorial assumes you know basic navigation and keyboard shortcuts to navigate the Creation Kit. If not, please go back and check out the Creation Kit 101 primer.
All of my guides will highlight things that are specific to your experience level: Green for beginners, and Red for seasoned modders. So if you’re new, you aren’t meant to understand the red messages, and if you’re a vet - you can probably skip the green.
Contents
Preamble
This guide contains a series of smaller tutorials to show you some of the more advanced things you can do with your building plans and VIP stories for Sim Settlements. It assumes you’ve gone through the tutorials and understand how to make buildings for Sim Settlements.
If you find something I added on one of my building plans, or want to do something I described in the other tutorials that isn’t covered here, contact me and I’ll expand on this guide.
Randomizing Building Models
One of the possibilities available with the Building Plan system that the core of Sim Settlements doesn’t even take advantage of yet, is the ability to randomize the building models themselves.
Imagine you have a complete building plan done, but at Level 3 you decide you want your settlers to paint their homes, yet you don’t want your model to always be painted the same color, or maybe you want a different style roof on each.
- Start by making variations on your building model via the SCOL/Nif/Static process. (Check out this tutorial on Material swaps if you don’t know how to change textures in order to do things like change the color: [1]).
- Next, go to the Object Window, then Miscellaneous->FormList and create a new Formlist, give it a unique ID, maybe something related to the building plan and the level you’re doing this for, then drag your building static and all of the variations of it that you created into this list.
- Open your Building Plan, open the script properties, select StageModels, then change the model for the stage you want to randomize to point to your formlist instead of the static.


That’s it! Next time your building reaches that stage, it will choose one of the statics from the formlist!
You can use this same trick on any StageItemSpawns as well! For example, you could randomize the door or a chair. Just be sure that all of the objects you use in your list will line up the same way with your model. To test this, place one of your potential random objects in the cell, and copy the position and rotation properties from the original to this potential random object and make sure it still looks good with those coordinates.
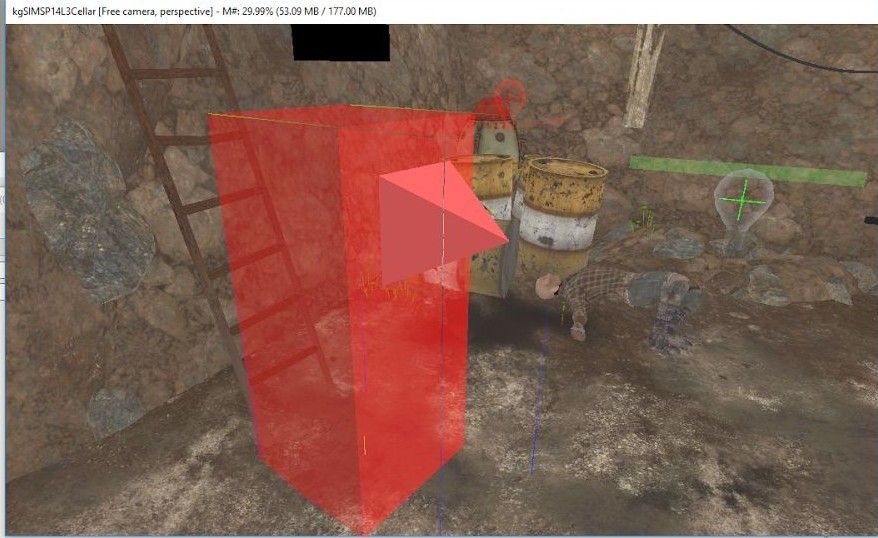
Teleporting Doors (or “It’s Bigger On the Inside”)
There’s no reason you have to limit yourself to the plot space! If you’ve played Sim Settlements for a while you may have stumbled upon a VIP with an underground cellar in their home.
In this section, I’ll show you how to create doors to custom cells that work with Sim Settlements.
- Start by creating yourself a new Interior Cell, or duplicating an existing one.
- To duplicate a cell, go to the Cell View window, right-click on the cell you’d like to copy and choose Duplicate, then rename your copied cell.

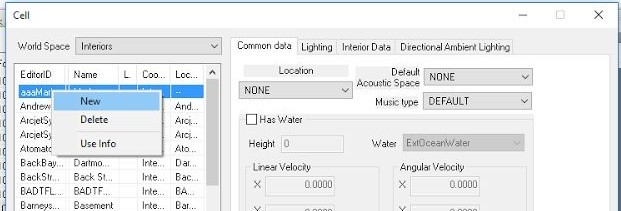
- To create a fresh cell, at the top of the CK, choose World -> Cells, then right-click on the left hand section and choose New from the right-click menu and enter a unique ID for your cell.
- To duplicate a cell, go to the Cell View window, right-click on the cell you’d like to copy and choose Duplicate, then rename your copied cell.
- Next we need to set up two objects, these will act as the objects the player will activate to teleport between the plot and your custom cell. We’ll start with the object that sits in your custom cell.
- In the Object Window, go to WorldObjects -> Door or WorldObjects -> Activator and find an object you’d like to use for the player to get back. This can be anything at all: a door, a ladder, a button, etc. Once you’ve chosen one, duplicate it and give it a unique ID (don’t forget your prefix!).
- Double-click your new object to open its properties, make sure it has something in the Name field or the player won’t be able to interact with it, then click Add under Scripts.
- Search for “dynamicreturndoor”, find SimSettlements:DynamicReturnDoor and press OK, press OK again to close your object’s properties.

- Now place your object somewhere in your cell.
- Next, go to the Object Window, WorldObjects -> Static and filter for “heading”, place an XMarkerHeading near your object, this determines where the player will be placed, rotate it so the arrow is facing in the direction you want the player to face. (If you don’t see the object, click on the render window and press M on your keyboard to reveal the Markers)
- Next we’ll create the object the player will activate on the plot to be teleported to your cell, we’ll call this the Teleport Door.
- Repeat step 2a and 2b to create another object the player can interact with to act as your Teleport Door, except instead of SimSettlements:DynamicReturnDoor, you’re looking for SimSettlements:kgSIM_MoveOnActivate as the script to add.
- Once you’ve added the script to your object, select the script and choose Properties.
- Double-click “AutoBuildParent” and select the only available entry in the list.
- Double-click “destination” and point it to your XMarkerHeading object by selecting your cell and the XMarkerHeading from the Cell and Reference dropdowns, respectively.
- Doublic-click “ReturnDoor” and point it your interactive object in the same way.
- Finally, set up your Teleport Door as a StageItemSpawn in your building plan, just like you would any other (as explained in tutorial 4).
- [Optional] Normally, with this method the player will be teleported back to the door that your plot spawned when they activate the door inside your custom cell. If you would like them to teleport back to a different location on your plot, follow these steps.
- Make a duplicate of the XMarkerHeading static item and rename it with your prefix (if you already have done this for another building plan, you can re-use your duplicate).
- In your building plan, set up a StageItemSpawn entry immediately before your Teleport Door. It’s VERY important it comes BEFORE the door.
- Now edit your Teleport Door form (not the return door in your cell), select the kgSIM_MoveOnActivate script and click properties, set the ReturnMarker property to your duplicated XMarkerHeading form.


This works by telling your teleport door to check the plot for an instance of the ReturnMarker form and if it finds one to use that as the location to return the player if they use the door in your cell. If an instance of that ReturnMarker is NOT found, the player will just be returned back to your Teleport Door.
Custom Agricultural Crops
This won’t show you how to make your own models, but it will show you how to take existing Fallout 4 flora, or flora you’ve added with your mod, and convert it so it’s compatible with Sim Settlements.
- Start by duplicating the Flora form you want to use in a Sim Settlements building plan, and give it a unique name.
- Look in the Keywords section, if you find WorkshopWorkObject, select it and press Delete on your keyboard to remove it.
- Look in the Actor Values section, if you find Food, select it and press Delete on your keyboard to remove it.

- Look in the scripts section, if it has a workshopobjectscript, select it and choose Properties. Select each of the properties under the FurnitureMarker section and press Clear Value on the right if the option is available.
- If you did not find the workshopobjectscript, click Add, search for that script and add it.
- Once the script is added, select it and choose Properties.
- Double-click WorkshopParent and select WorkshopParent from the drop down list (should only be one entry).
- The rest of the properties can be left blank. Press OK to close the script properties, and OK again to save your object changes.
- Your flora is now ready to be placed as a StageItemSpawn!

Changing Dynamic Needs
If you want to alter the way your building plans affect Dynamic Needs, there is now a simple way to do so (as of patch 2.1.4). On your Building Plan, you’ll find a new property called SettlementResources - this is where the magic happens.
For Branching Plans, you’ll want to do these on the actual plans, not the paths and not on the master plan.
The SettlementResources property can hold as many changes as you like, it will allow for AI driven building plan selection, and it’s much less system intensive than the way Sim Settlements was previously providing resources (by spawning invisible furniture objects).

When you add a new field to SettlementResources, you’ll have several options to fill out - only 3 of them are absolutely necessary, one of them you’ll never use, and the rest are optional if you want finer control.
- AVToChange - This tells Sim Settlements which field to alter. You’ll generally be using one of the following: SafetyAV (Defense), Water, Food, WorkshopRatingBonusHappiness (Happiness), WorkshopRatingScavengeGeneral (Scavenger rating), vendorIncome (Caps/day per settler), PowerGenerated (For power producing buildings), and PowerRequired (to make your plan require additional power).
- AVValue - The amount to adjust the AVToChange. In general, positive numbers are used to provide a bonus, and negative numbers are use to apply an extra cost. The exception to that rule is Power. If you want to add a cost, use a positive number and PowerRequired.
- iLevel - The plot level this change will be applied. There are no level ranges, if you want a benefit to continue, you’ll need to create an additional entry for each level.
- BuildingPlans - DO NOT USE.
- OwnerAV - [Optional] If this and OwnerValue are set, the owner of the plot must have this ActorValue = OwnerValue as one of the requirements for this to take affect. This is a great way to implement settlement bonuses for your VIPs.
- OwnerValue - [Optional] See OwnerAV description.
- WorkshopAV - [Optional] If this and WorkshopValue are set, the settlement this plot is in must have this ActorValue = WorkshopValue as one of the requirements for this to take affect. This could be used in combination with the Building Path system to apply additional benefits and penalties based on other buildings in the settlement.
One this to always keep in mind when playing with these values, is balance. If you put too harsh a penalty, or even too big a bonus, it will not only cause balance problems with the mod, but will also make your building plans less desirable. If you’d like to see the existing values used by Sim Settlements, check out the SettlementResources field on the actual plots, which follows the same format as those on the building plans.
Resource Generation
If you’re creating a new Industrial or Agricultural building, you may want it to produce specific resources, as of patch 2.0.0, you can now do so!
To do so, you’ll need to create LeveledItems. These can be created in the Object Window by expanding the Items category and selecting LeveledItems.
The basic premise of a LeveledItem, is that you add items to the table on the left and set their quantities. The Use All checkbox will ensure they gain all of the lines of items you enter, or leave Use All unchecked to give the player a random item from the list.
LeveledItems can get fairly complex, you can nest them together, tie them to player level, and with creative use of the Use Global system, you can even arrange for other things in the game to dynamically affect which items are created. This tutorial won’t go into the specifics of how each field on them works, they are best learned by looking at examples in the Creation Kit.

You’ll need to create a LeveledItem for each level of your building plan.
Once you’re satisfied with your LeveledItems, open your building plan, expand the Advanced section (double click it) and add your LeveledItems to the ResourcesGenerated property in ascending order (ie. the LeveledItem to generate for the level 1 version of your building should be 1st, the level 2 LeveledItem should go 2nd, etc).
If you are using the Building Path system for advanced building plans, you may want to set these up on the Path object instead of the building plan (see tutorial 10). Setting them on the Path level allows you to create variations of the building plan for that path that will rely on the same resource generation to give them some consistency.