Toolkit Chapter 00 Creation Kit 101
This documents you went through the Getting Started guide and have the necessary software installed. If not please check out that guide first and then come back.
Contents
Welcome to the Wonderful World of Modding
This guide is going to teach you some quick tips on navigating the Creation Kit.
Note: If it’s still intimidating after going through this, watch some of the tutorials by darkfox127. His tutorials are actually for Skyrim, but the Creation Kit used for Skyrim is nearly identical to that for Fallout so a lot of the same lessons apply. If you’d prefer to only watch tutorials about Fallout, I’d recommend videos by Seddon4494.
Both of those youtubers are very thorough and keep things simple. Even if you don’t follow along, but just watch and listen, it will all start to click!
At some point I will release a series of videos where I essentially go through my own tutorial series so you guys can watch it happen. In the meantime, a Discord channel has been set up for people to hang out and work on Sim Settlements projects!
Keep this document handy as I’ve tried to design in a way that you can use it as Quick Reference while you’re going through the other tutorials. May even be worth printing out some of it.
By the time you finish this guide and complete the tutorial series, you will officially be a modder! A lot of the things you learn building for Sim Settlements will carry over and allow you to create new mods for not only Fallout 4, but Skyrim as well.
Creation Kit
Let’s get the Creation Kit (CK from now on) open and I’ll introduce you to all it’s pieces. Please be patient with this software, it can be a little slow at times.
- Start by clicking File->Data at the top left.
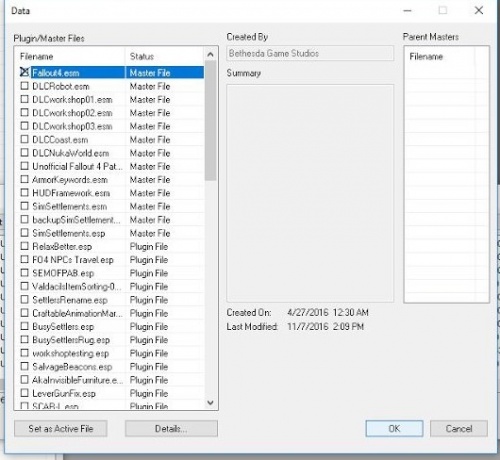
- When the above window is displayed, double-click Fallout4.esm to select it and press OK.
- a. The CK will now load the Fallout 4 game files. This could take a bit of time, so be patient.
- After it loads the files you will end up with a bunch of windows similar to the below image
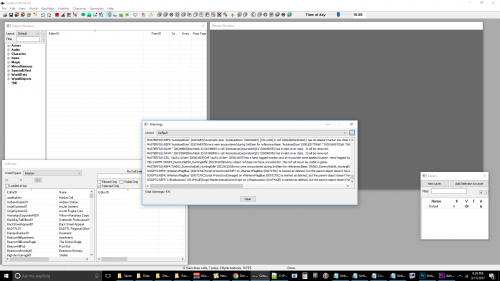
- The first window is the Warnings window. Here’s what you’re going to do with it: Grab one of the corners and shrink it down as small as it will go and then drag that window off to a corner and never think about it again (unless something unexplainable happens - but it will be awhile before you can recognize what’s unexplainable since this is all going to feel like voodoo for a while!)
- a. The CK constantly fires warnings, and for some reason Bethesda decided to have this pop-up in front of your other windows when they do. To prevent that from happening, you just never close it, just push it out of the way.
- The next window we’ll talk about is the Object Window. It’s generally in the upper left hand corner.
- a. This window is broken into two parts, the left lists the various categories that the game files fall under, while the left lists the actual game files when you click on the category they are in.
- b. One of the most important parts of this window is the Filter at the top left. Typing things here will make only game files (often referred to as Forms in the CK) whose names have what you type in the Filter appear. The Sim Settlements tutorials will give you plenty of examples for using the filter.
- Below that we have the Cell View Window. Cells are small sections of the game world. In order for your game to run smoothly, only a handful of it is loaded into memory at a time.
- a. The dropdown menu labeled WorldSpace is kind of a categorization tool - but also represents when a load screen will happen. Notice that it only has a few entries.
- i. Interiors which are generally the insides of large buildings and caves. This is the only list where each cell is completely separate, the others are all stitched together to make one continuous world within their category.
- ii. For example, The Commonwealth contains the majority of the game world, that’s the main area you run around in after you exit the Vault. All of the cells in this list are interconnected.
- iii. The same applies to the other Worldspaces (except for Recent Cells is exactly what the name implies! A list of cells you’ve opened recently.
- a. The dropdown menu labeled WorldSpace is kind of a categorization tool - but also represents when a load screen will happen. Notice that it only has a few entries.
- To segway into our next Window, go ahead and double-click on any cell and then wait a bit while the Render Window (the large one with the grey background) displays some of the game world to you.
- a. The Render window is where you manipulate things graphically. Believe it or not, most modding never actually requires this window. I know when I started modding I was shocked to learn how much of it is done in the equivalent of text fields. Don’t worry though, adding things to Sim Settlements is very visual - so you won’t be staring at spread sheets for hours!
- Once the cell has loaded, I’m going to show you some basic means of moving around.
- a. Click on something, anything at all - it should highlight in a green color (if it didn’t, that means you grabbed an invisible helper object usually called a Marker - press 1 twice on your keyword to hide this thing, and try grabbing something again. Repeat until you grab the object you want. Note: To Unhide everything you hid, press Alt+1)
- b. Once you have something selected, hold the Shift key on your keyboard and move your mouse around (no clicking or holding mouse necessary) and you will rotate your camera around the thing you have selected!
- c. Use your mouse wheel to zoom in and out. Hold the Middle Mouse button while moving your mouse to pan left/right and up/down.
- d. Hover over your selected object to turn your cursor into the move symbol, left-click and drag to reposition things.
- e. Hover over your selected object again and right-click and drag to rotate the object around the Z axis (if you’re not good with X,Y,Z, don’t worry you’ll start to get them eventually).
- f. Press the E key to bring up three arrows, if you mouse-over the arrow it will turn yellow. You can then drag on that arrow to move your object in that direction, drag the opposite way on the arrow to go the other direction.
- g. Press and hold the Z key while dragging your object to move it only up and down. The C and X keys do something similar for other directions.
- h. Press the W key to bring up a rotation helper, click and drag any of the circles to rotate your object in different directions.
- Now let’s practice adding something to a Cell.
- a. Go to the Object Window on the left. Click in the Filter box and type in “Farmer”. Drag one of the forms that starts with EncWorkshopNPC into the game world that you see in the Render Window and release your mouse (It will look like a red cancel symbol until you let go of your mouse - that’s normal [it’s actually odd, but that’s what happens!]) You’ll now have a new farmer in the game world! You can use the movement and rotation tools you just learned about to put them wherever you want.
- Now that I’ve shown you all of that, don’t ever do it again (inside one of the base game’s Cells). When you edit the game’s cells and save your addon, those changes get saved to your file, even if you don’t want them to and even if you hit Undo! Don’t get hung up on it for now, just know that in general, you should stay out of the main game cells while you’re building a mod.
- The last window is the Layers window. This let’s you organize objects in the game world, just like you do in Photoshop or similar programs. You will use it during some of the Sim Settlements tutorials.


You’re Ready For Tutorials!
Most of the things I explain in the tutorials will go into very minute detail, so the above camera and object movement should be enough to get you through! The last pages include some links to some useful resources, a Hot Key Reference sheet with all of the things we went over (plus a few bonus ones!), and then a primer on some of the object types in the CK that you can reference while doing the tutorials.
Head on over to the Getting Started guide!
Miscellaneous
Useful Links
Official Hotkey Reference Page: https://www.creationkit.com/index.php?title=Creation_Kit_Keyboard_Mapping
Creation Kit Wiki: http://www.creationkit.com/fallout4/index.php?title=Main_Page
Darkfox127 Tutorial Videos: https://www.youtube.com/user/DARKF0X127/playlists
Seddon4494 Tutorial Videos: https://www.youtube.com/playlist?list=PLElczpoUwHC4jZXDF_3mp_iXgALiLHw-k
Hot Key References
Controlling the Camera
- Left-click an object, then Hold Shift while moving your mouse to rotate the camera
- Mouse Wheel to zoom the camera
- Hold Middle Mouse button while moving the mouse to pan the camera left/right and up/down
Moving/Rotating Objects
- Left-click and drag a selected object to move it around.
- Right-click and drag a selected object to rotate it on the Z-axis
- Press E to bring up arrows to move your object with
- Hold X or C for forward/backward and left/right
- Hold Z for up and down
- Press W to bring up a rotation helper, dragging one of the circles will rotate your objects in different directions
Hiding/Showing objects
- Press 1 to fade something out, Press 1 twice to hide it.
- Press Alt+1 to unhide/unfade everything
Creating/Breaking Down SCOLs (We didn’t cover these, but you’ll make heavy use of them during the tutorials)
- Alt + O To create the SCOL
- Alt + U To fragment the SCOL
Understanding the Object Types in the Creation Kit
Thanks to damanding for this write-up!
This section will be best referenced throughout the tutorials. You’re welcome to read through this now, but don’t worry if it doesn’t make sense immediately. As you start working the Creation Kit the explanations here will become more useful.
In order to complete the Chapter 02 - Creating Your First Building tutorial it helps to have a basic understanding of what the object types are in the Creation Kit (CK) and how they are related for the purposes of building plots for Sim Settlements.
Important terms that are not CK objects
Collision: Collision is a concept that is far more complex than what I'm about to describe, but this oversimplified definition will be good enough for our purposes. Collision as it's normally used in this document refers to the 3d boundaries of the object. If I say collision data, I'm talking about how the game's physics engine interprets interactions between that object and others. Interactions like, can you kick it? Does gravity affect it or is it stuck in place and immovable?
Creation Kit Objects
Forms: - Every object in the Creation Kit is considered a form. Whether it be an object you might see in the game, such as a gun, or a character, or simple descriptive objects such as Keywords, which have no graphics, but serve an important role in the game.
Moveable Statics: If an object can have physics applied to it, it's called a moveable static. Smaller items can be kicked around by your player character or an NPC such as those blue plastic bins, larger items such as cars can be affected by gravity and fall off of an overpass. Any object which gets thrown across a room during an explosion is a moveable static.
In addition moveable statics are items which the player can interact with in terms of physics impact, but cannot be picked up and added to the player's inventory. You cannot use moveable statics without converting them to statics first in your SCOLs (you’ll learn about these ahead and the creation of them will be explained in the tutorials).
If you use the F4 button and look at an object's preview these will have a blue collision frame in preview. Moveable statics have a gray icon with lines and an orange arrow coming off of it.
CK Wiki entry: [1]

Static objects: These are any immovable object from a beer crate to a wall. They make up a large portion of the items you see in game. Most of the objects built in workshop mode are statics (the things you can’t interact with).
It is possible to create a new static and point it to a model which is normally used for a moveable static. This will allow you to include it into SCOLs and will also allow you to make it constructible in game. However, if you do not include it in an SCOL or modify the actual collision data via some method (outside the scope of this tutorial, but when you feel you are ready - ask and we’d be glad to teach you!), then the object will retain its moveable characteristics (see "pseudo statics" at the end).
If you use the F4 button and look at an object's preview these will have a red collision frame. Static objects will have a purple/blue house icon in the CK.
CK Wiki entry: [2]

SCOL (Static Collection): These are a series of static objects that are grouped together into one piece (that can also still be broken down into individual pieces). SCOLs play a very important role in making Sim Settlements work. SCOLs can convert moveable static collision data into static collision data if the correct process is used (see "pseudo statics" at the end).
SCOLs also can be used to bake large non-interactive furniture into your building's collision information to make NPC path finding easier. The reason for using SCOLs versus assembling parts individually is that when you combine multiple objects into a SCOL it also creates a combined collision that is also true static collision. That collision information (both the static data and the combined boundaries of the objects) is critical for NPC movements in the game and telling them how they can interact with your objects.
If you use F4 while viewing your SCOL either in a test cell or in preview it will show a red collision frame. SCOL objects will have a green icon with the letters SC (see above image).
Brief overview of FO4 SCOLs in CK wiki: [3]
A much older (Fallout 3 era) but more extensive wiki page on SCOLs, some of which is out-dated: [4]
Misc. Items: Misc items are similar to moveable statics in that they have similar physics properties and collision data. The difference is that players and NPCs can pick up misc objects and add them to their inventory. Typical junk items like coffee cups, telephones, and empty bottles are all considered misc objects. As I will explain later, Misc objects get a somewhat more unusual usage in Sim Settlements as building plan templates. Misc objects will have a blue collision frame in preview windows. Their icon looks kind of like a bag with gems falling out.
CK Wiki entry: [5]

Formlists: Formlists are used to create lists of other Forms (remember from above, Forms are any item in the Creation Kit). The workshop menus are actually a collection of interlinked formlists and keywords, same with the crafting menus in crafting benches. Formlists don't have an object to preview, they are literally just lists. They have an icon with a red question mark and a lined page.
CK Wiki entry: [6]

Quests: Quests are one of the most complex object types in the entire CK. They basically combine the story, dialogue, scripts and much more information into one package. Quest objects are not just limited to the form of story type quest you're familiar with as a player. Often quest objects are running in the background for the purposes of having scripts perform a task. These quests will never have an entry in your pip-boy. Sim Settlements uses quests in this way. Quest objects have a yellow box with a question mark for an icon.
CK Wiki entry: [7]

How These Objects Are Used In Sim Settlements
Now that you have an overview of each of these object types, how are they used in Sim Settlements and how to they interact? You'll get experience making each one of these object types in the first significant tutorial of the series. First static objects are the "Lego blocks" that Kinggath refers to when it comes to creating your buildings, parts of your decor and more. You can use some Misc and Moveable static items as decor but they must first be converted to what I call "pseudo statics", they will have the static object icon but they still have misc or moveable static collision data until they're baked into a SCOL.
Misc items are also used in a unique way this mod. Instead of just referring to types of items you might like to use for decor such as a Nuka bottle or plate and silverware, this category of object is also used as a building plan template. The building plan tells the mod which model (for example style of house) to use for a particular plot type. The building plan also tells the mod what to use at each level upgrade.
The building plans are then added to formlists. Each plot type and size gets its own formlist, so there will be a formlist for Residential Size A plots, a formlist for Commercial Size A plots, and so forth. These formlists are then linked to from the Quest so that the scripts will know which models to build for which plot types.
"Pseudo Statics"
Creating a static object and assigning a normally moveable static to it requires changing the collision data as well. Simply changing the object type is not enough. If you make a pseudo static object from a moveable static and include it as part of a SCOL, the process of making it turn into a SCOL actually changes the collision data and makes it no longer moveable, it becomes a true static.
If you do not add it into a SCOL then the only other options for changing the collision data is to use 3ds Max with the official Bethesda plugin or using Nifskope to "borrow" the collision data from another static object that is similar in size and shape.