Toolkit Chapter 02 Creating Your First Building
This tutorial assumes you know basic navigation and keyboard shortcuts to navigate the Creation Kit. If not, please go back and check out the Creation Kit 101 primer.
All of my guides will highlight things that are specific to your experience level: Green for beginners, and Red for seasoned modders. So if you’re new, you aren’t meant to understand the red messages, and if you’re a vet - you can probably skip the green.
Contents
Setup
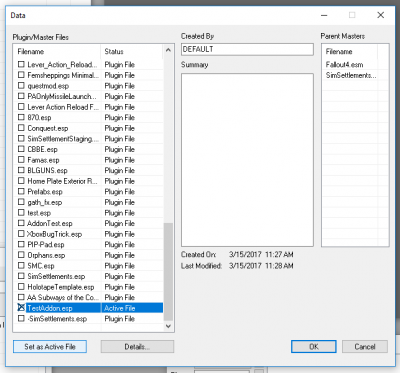
- Open the Creation Kit, click File->Data, check in both Fallout4.esm and SimSettlements.esm, then press OK. If you get an error about multiple master files, go back to the Getting Started guide and confirm you added the ini settings.
You don’t have to set SimSettlements as the Active file, because it’s going to become a parent of this new mod file you’re about to create. - Now you’re going to create you a new file that is linked to SimSettlements. Go to File->Save, choose a name for your mod file, and save it.
- In the future, when you want to work on the mod, go to File->Data, select your mod in the list and press the Set As Active File button, then press OK. It will automatically load the Sim Settlements data from now on as your mod file requires it.
- In the future, when you want to work on the mod, go to File->Data, select your mod in the list and press the Set As Active File button, then press OK. It will automatically load the Sim Settlements data from now on as your mod file requires it.
- Next, go to the Cell View window. By default it is in the lower left corner (if it’s missing - open the View menu and select Cell View Window). Make sure the World Space dropdown is set to Interiors. In the left side of that window, there is a column labeled Editor ID, click the first item in the list and start typing kgsim - this will jump to cells with that in the name. Find kgSIMBuildingStage and double click it.
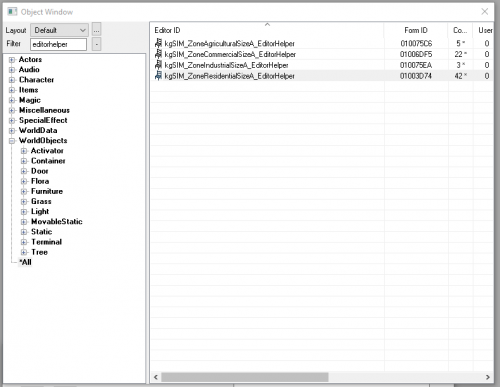
This is a mostly empty cell with a platform placed in the center of the cell for us to start doing our construction. The reason for this will become clear as we go on. If you already have your building models ready and are just looking for how to integrate them into Sim Settlements, keep reading as there are a few of the steps you’ll want to do even if you already have your model that will ensure your model is positioned correctly when spawned by the plot. - Next, go to the Object window. By default this is the window on the left hand side that lists the types of objects in the game. Enter "EditorHelper" (without the quotes) in the Filter box (case doesn’t matter in the filter window, but it’s used here for easier reading). This will display all of the plot types on the right (if nothing comes up, make sure you have “*All” selected at the bottom of the object types list in the Object Window. If you don’t see that, look at the left half of the screenshot below for reference). These are used to help align and size your building, so you know it will fit nicely within the plot area.
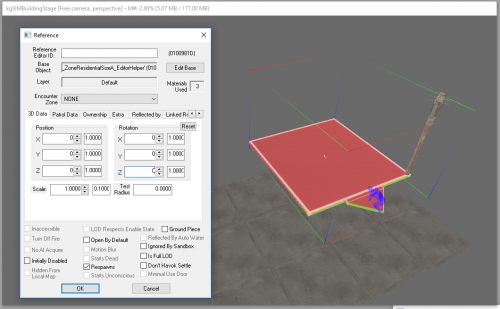
- Find the one that matches the type of building you’d like to create and drag it into the Cell (Use the ones with 2x2 in the name as these are the default size most players will use. The others will still work, but will result in your working with about 15% less build space). Now double-click the plot model, or right-click on it and choose Edit. The properties window will appear. On the 3D Data tab, change the Position X, Y, and Z values to 0, and the Rotation X,Y, and Z values to 0 as well. Then press OK.
- Centering it in the cell will become more useful, when you get to later tutorials, but it’s a good habit to get into when building things for Sim Settlements as it will save you a ton of time later on.
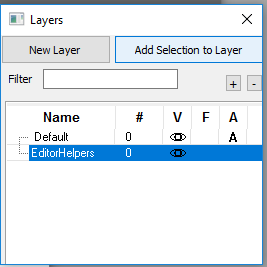
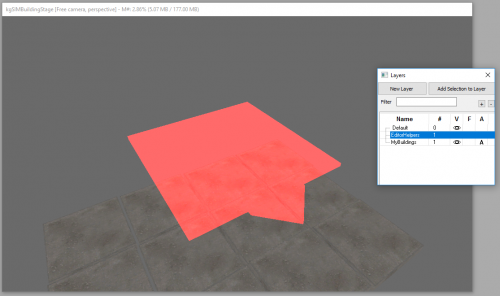
- Make sure the model is selected, then go to the Layers window (usually in the lower right corner). Select the EditorHelpers layer (if you don’t see this, click New Layer and give the layer a unique name such as YourName_EditorHelpers_Layer), then choose Add Selection to Layer. This will make it easy for us to hide the helper and get it out of the way. If you click the Eye icon in the Layers tab you can toggle our helper on and off.
- Next, you’re going to add a second helper object. This will be used to ensure your origin is correct in your models. The origin determines the exact spot your model will appear when the game creates it: if the origin was on the roof, for example, your model would be underground in the game!
- Before you do the next step, be sure that Markers are displayed in the window. You’ll know if they are, because the EditorHelper you placed will have a large green shadow of the plot. If you don’t see this, click on the Render Window (the one that’s displaying the 3d stuff), and press the letter M on your keyboard.
- Go to the Object Window and filter for AlignmentHelper. Drag the version of the helper with 2x2 in to the name into the cell, and set its position and rotation to 0, the same way you did for the editor helper. (The other helper without 2x2 in the name, was the former default size which was much harder for players to work with as it didn’t match up to standard floor tiles. You are still welcome to use that alignment helper, but you’ll be sacrificing about 15% of your available build space!)
- It should be hidden snugly inside the Editor Helper, and the color will change; this is normal. Now when you toggle the Eye icon on the EditorHelper layer, our Alignment Helper object should be displayed on its own. You can toggle back and forth as you build to see the Utility pole (so your model doesn’t cover it up). And you can toggle the Alignment Helper with the M key on your keyboard.
- The alignment helper is going to be baked into your model. It is flagged as an EditorHelper so it won’t be rendered in game.
- The alignment helper is going to be baked into your model. It is flagged as an EditorHelper so it won’t be rendered in game.


Start Building!
Now that your workspace is set up, you’re ready to start building.
In the Object window, erase what we typed in the Filter box, then expand the WorldObjects type, and click Static.
This is your box of lego pieces, you can use just about anything you want! Just drag the pieces into the cell and line them up to create your structure. Your goal is to stay within the lines of the helpers you created, and you want your model to end up flush with the BOTTOM of the helper, or maybe sunk just a little lower than that.
If you don’t know how to move around the window, or rotate and move objects, check out the Creation Kit 101 primer.
Follow the guidelines below to make sure your models work well with Sim Settlements. Then after you’ve finished your building, come back to the next steps where we’ll go over how to get it into the game!
Building Tips and Guidelines
Now I’m not going to limit your creativity as far as art direction goes (unless you’re looking to contribute directly to the Sim Settlements mod file - in which case see the Style Guidelines article), but I do want to give you some helpful hints to make sure your buildings work within the system.
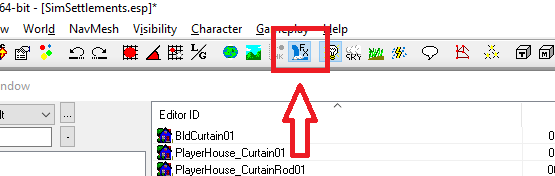
- Animated Objects - Watch out for animated statics! They will not work as part of your core model (you can add them in the later tutorial that covers Furniture/Decorations/etc). To test if a static is animated, place it in the cell, and turn on the Animate Light and Effects button, which can be found on the toolbar at the top of the screen:
- Example Buildings - I set up an Interior cell named kgSIMTestCell which has all of the version 1.0 building models laid out on top of helper objects for you to explore. This will help you see how these buildings are constructed relative to the helper object. If you want to see the individual pieces of any building that seems to be all one unit, Right-click it and choose Fragment Static Collection, and it will break the model into its pieces.
The models in game are not SCOLs, I use those as the first step because the Creation Kit, unlike Outfit Studio, creates near-perfect blended Collision without you having to go through any extra steps. - The Plot Helper - The plot helper represents all your available real estate; if you want to leave them some space for outside furniture, or maybe a tiny little yard, it has to fit within this plot space.
When dealing with the arrow, imagine that it isn’t there and that you have the remaining box to build within. The space from the base of the arrow to the point is reserved for Sim Settlements to create things like the scaffolding, and the mailboxes you’ve seen in game. - The Arrow - The arrow in the helper represents the front of the plot. It points to where your players expect the front of your building to be. While you don’t necessarily have to place your entryway in that direction, make sure your settlers have a path from the front of the plot to your entryway.
If you want an example of how to pull off a side entrance, check out the level 1 clothing store. That’s about the amount of space between the building and the utility pole you need to leave to make sure the NPCs can get by from the front. - Depth and Height - You want the bottom of your model to be flush with the bottom of the helper. You can go a little lower to make sure the model is on the ground all the way. If you’re building a farm model, I recommend you build dirt that goes very deep into the ground, to cover up the rocky ground of Fallout 4.
You can technically build up as high as you want, although settlers generally won’t even use the second floor. The game has very poor navigation for areas above the ground, especially with objects that are created during the game, like those of Sim Settlements. - Stick to the Structure - For this building step, you should focus on the core of the building: the floors, walls, and roof. Things like furniture, decorations, and doors are covered in a future tutorial. You can always start placing the stuff now to get an idea of your spacing, but you might want to create a new layer and place that stuff there so you can quickly hide it, as we’re going to need to get access to just the building itself at some point.
To create a new layer, go to the Layers window, click New Layer and give it a name. Then select the objects you want to move to that layer and press Add Selection to Layer. If you get a warning about moving them from another layer, answer Yes. - Large Static Furniture - Large pieces of furniture that aren’t interactive can be placed now; things like tables and dressers. Baking them into your model makes Settler Navigation much easier to implement. You’ll always be able to take the same home model and reposition the furniture to create another look later on.
- Doorways - If you’re using any of the prebuilt doorway statics that look like they can perfectly hold a door, you need to avoid those with a NavCut (A NavCut helps the NPCs in the game navigate their way through doorways - but because of the way Sim Settlements creates buildings, NavCut doors actually work in reverse and block NPCs from walking through them). I have included versions of the four workshop doorways that have the NavCut removed; filter for kgsim_navcutremoved and you should find them there.
To test if an object has a NavCut, drag the object into the cell, click anywhere in the cell, and press F4 on your keyboard. After a few seconds, this will show you the collision boxes for everything (sometimes you have to press F4 a second time to get this to work).
If the doorway you’re checking has a black outlined box around the model, this is a NavCut. If you would like it removed from one that I didn’t do already, please contact me and I’ll walk you through it, it’s fairly simple!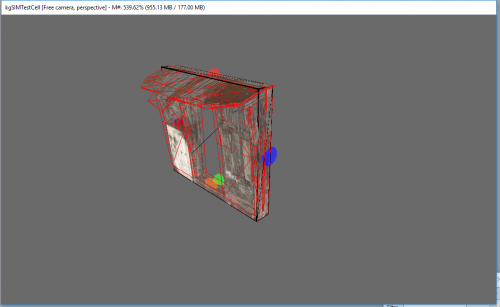
- Building Levels - I’ll cover some pointers on building the Level 2 and Level 3 versions of your buildings near the end of this tutorial; just keep them in mind while you’re building. If you go too crazy with level 1, you won’t have any room to make your building look cooler as it upgrades!
Also note that the big payoffs for levels 2 and 3 are supposed to be electricity, and then decorations. So while I won’t force those requirements on you, the art itself it is one of the mechanics of Sim Settlements - so I’d ask that you at least consider that when deciding how to design your buildings. - Utility Pole - Each model has a utility pole. You are welcome to attach things to it with your model, but don’t completely cover it, and keep your model clear of the electrical connection points or the plot won’t function correctly.
- Partially Invisible Items - A lot of the statics you’ll find included with the game are only visible on one side, or are partially invisible at different angles. You can still use these in your models, but be sure to cover up all those invisible spots. There are usually full sets of pieces, all with a similar name, that work together to build rooms. Opening another copy of the Creation Kit to go look how Bethesda used those pieces is a good idea.
Note that while you can use these types of building pieces in Sim Settlements, they just don’t make the best pieces for the construction stages (which will be covered in the next tutorial) so you may have to manually build the construction framework out of other meshes.
- Static Collections - If the object you want to use has a green icon in the Object Window, you can still use it; but after you drop them in the cell and have them positioned where you want, you’ll need to select them in the Cell window and press Alt + U on your keyboard (you can also right-click them and choose Fragment Static Collection). Otherwise they won’t work in a later step.

- Super Easy Build Pieces - If you want to get started quickly, find the workshop pieces (they usually have “workshop” in the name). They work very well, have no invisible sides, and all follow the aesthetic of Sim Settlements if you’re looking to contribute directly.


Creating Your First NIF File
Got your first building done and ready to see it in Sim Settlements? Let’s go!
We’re going start by using a tool in the Creation Kit called Static Collections. These allow us to combine a bunch of smaller models into a single model. This makes working with them a lot easier, and it’s a necessity for working with Sim Settlements.
If you prefer to build combined models in Outfit Studio or some other tool, you are welcome to do so. Just be sure that your origin results in the building aligning correctly on the plot which you’ll be able to test soon.
IMPORTANT - BEFORE YOU TRY CREATING A STATIC COLLECTION - ALWAYS SAVE YOUR FILE. If you accidentally used an unsupported model, such as an animated static, it will crash the Creation Kit.
- Start by hiding the EditorHelpers layer and any layers you may have added to hold temporary furniture or decorations. All that should be left showing are the pre-placed cement base below your model, the pieces that make up your building, the Alignment Helper, and any major pieces of furniture you decided to bake into your model for NPC navigation purposes (explained in the Building Guidelines above, if you skipped that section).
- If anything else is showing, you can hide it by selecting it, then pressing 1 on the keyboard twice. To unhide everything you hid, press Alt+1
- Drag a box to select everything that’s showing except for the cement base below. DO NOT INCLUDE THE EDITOR HELPER WITH THE UTILITY POLE! That should be hidden at this stage.
- Now, hold ctrl, and click on the Alignment Helper so it is deselected; then while still holding ctrl, click it again.
- Why did we do this? When you create a Static Collection, which we’ll do in the next step, the very last piece selected in a group is used as the origin. This ensures that our model will always spawn exactly where it’s supposed to on the plot!
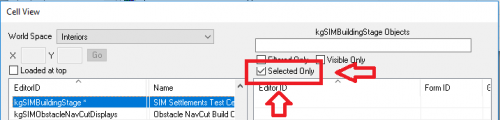
- I can’t tell if I clicked it… In the Cell View window you can check in the Selected Only option to see a list of all the things you currently have selected.
- Now press Alt+O (the letter) on your keyboard. It will ask you to name your collection (if you have trouble remembering the keyboard command you can right-click on the group of objects you have selected and choose Make Static collection - though right-clicking risks rotating your model - which you don’t want to do or it may not fit in the plot any more!).
I would recommend making up a prefix to start all your model names with (for example, I use kgSIM_), so that you can filter for all the things you’ve created in the Object Window.
It would also be a good idea to include SCOL in the name, for example kgSIM_TutorialHouse_Level1_SCOL. This will make more sense later on.- If the Make Static Collection option is not there, and instead you only see Fragment Static Collection - it means one of the items you used was already a Static Collection. You’ll need to Fragment it and then go back to step 2.
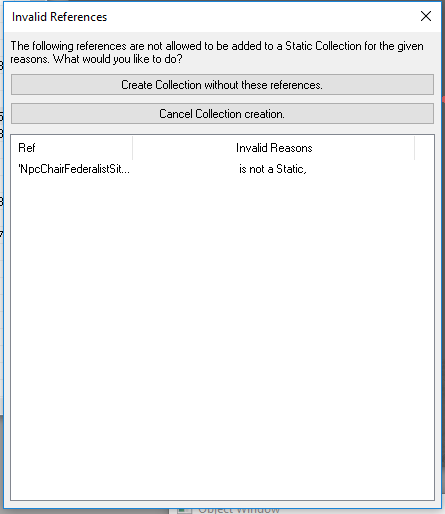
- If you receive a message that looks like the below, click “Create Collection without these references.” It just means that you forgot to hide an object that wasn’t a Static type. No harm!
- If your model falls into the world all of a sudden, you know why I left that concrete platform down there! Occasionally, the Creation Kit will enact havok physics on a model for no apparent reason even if you have the Havok Sim option turned off! This platform will catch your model so you can still grab it easily and fragment it again which should stick it back in place.
- After you name the model, you will receive another pop-up titled Input Object Window Filter: don’t enter anything, just press OK.
- Bonus Step: If you’ve gone through this tutorial already and are just coming back for a refresher, or if the red text is for you, you may want to pause here and skip ahead to the Settler Navigation tutorial. You’ll save yourself a little bit of repeat work in the long run.
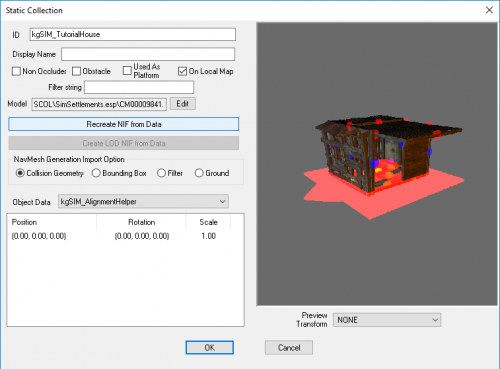
- We’ve almost got your model created! Double-click your model to bring up the properties, then click Edit Base, which will bring up a preview window with some information (you’ll notice it is all one piece now instead of your individual building pieces. This is now what I’ll refer to as a SCOL, which is just an easier way to say Static Collection).
- Confirm it looks correct; you can drag with your mouse in the preview to view it from all angles (if it looks wrong, go back to your model, press Alt + U to break it back into its pieces, then go back and repeat the steps above and make sure all of the pieces are selected as you continue).
- Next, in the Object Data drop down, find the kgSIM_AlignmentHelper and select it. Make sure its position and rotation are all zeroes. If not, you missed step 3 above; fragment the collection and go back.
- Now that we’re sure the SCOL was created correctly, click on Recreate NIF from Data.


Sanitizing your NIF File
At this point, we’re going to minimize the Creation Kit and work with our model file directly.
- Navigate to your Fallout 4 directory. It’s usually under something like C:\Program Files\Steam\steamapps\common\Fallout 4 - it may be worth it to create a shortcut to this directory on your desktop, as you’re going to come back here frequently.
- Open the Data\Meshes\SCOL directory, and you should find a folder named after your esp file. Inside of this folder will be a model with a name made up of letters and numbers. Rename it to be the same as what you named the SCOL, except without the _SCOL suffix. Technically you can name it whatever you want, but this will make finding it again later much easier!
- Then we’re going to move this model out of this folder. You can use Cut and Paste, or you can open a second folder window and drag it out. In your Fallout 4 directory, go to Data\Meshes and create yourself a new folder. This is where we’ll keep all of your models for this building pack. If you’d like to organize further you can create as many subfolders here as you like. Once you’ve setup your location, move the file there.
- Now open the model in NifSkope (if you don’t have it, head back to the Getting Started guide for a link and version requirements). You can either double-click the model and use the windows system to assign the file type to NifSkope, or open NifSkope first and then use File->Open.
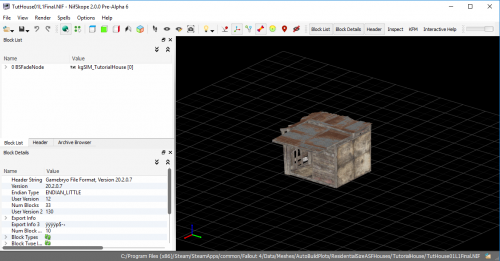
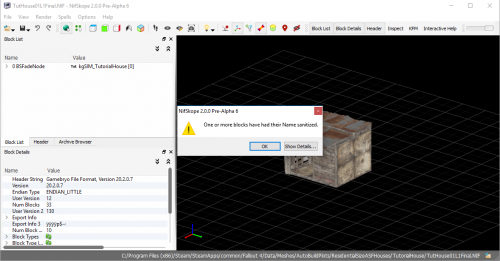
- Once your model is open in Nifskope, just select File->Save. It will give you a warning about names being sanitized. At this point, that’s all we need to do in Nifskope, so you can close it.
If you have auto-sanitize turned off, you can instead just make sure all of your nodes and trishapes have a name. Not having names on these can cause CTDs in the game and in the Creation Kit, especially when we get to adding advanced features to them, such as Obstacle Navcutting and Editor Markers in future tutorials.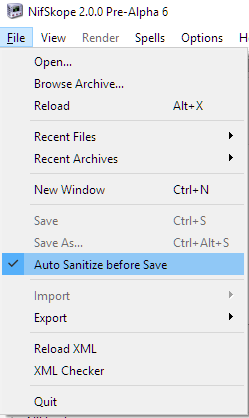


Creating Our Static Object
Now we’re going to create our static object that will actually appear in the game!
- In the Object Window, go to WorldObjects->Static on the left. Then, anywhere in the right half of the window, right-click and select New.
- Enter a unique ID for your model, preferably with that unique prefix we discussed earlier. If you followed my advice, you can use the exact same name you used for your SCOL, but remove the _SCOL suffix. This will make it very easy to match up the models later on if you ever need to edit them!
- You can give it a display name if you like, but it won’t be used anywhere for our purposes. Then click Edit near the middle of the window; this will bring up the 3d model screen. Click Edit on this screen and navigate to the model we just saved from Nifskope.
If the Creation Kit crashes at this point, it means one of the models you included in the SCOL is not supported. This is pretty rare, and if you need help figuring out which part is breaking it, hit up the forums or Discord channel and myself or someone else more experienced with nifs should be able to identify the issue fairly quickly. - Press OK to confirm your model selection, then press OK again to finish the creation of your static.
Static Model complete! Let’s get it in the game!
Creating Your Sim Settlements Building Plan
In the Object Window, expand the Items section, then click on "MiscItem". Now Filter for “building”. This will bring up all of the building plans in Sim Settlements. You’re looking for the one called kgSIM_BuildingPlanTemplate.
Right click on that and select Duplicate. Now open that duplicate up - it should be named kgSIM_BuildingPlanTemplateCOPY0000. In the future you can then just do the below steps.
- Change the ID to something you can remember. As before keep using that prefix you came up with - you’ll thank me later!
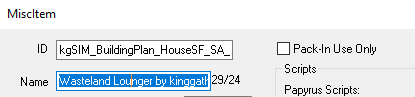
- In the Name field, this is what will show up on the Building Plaque when your building plan is chosen. Use the format “Building Name by Your Name.” You can name your building whatever you like, but try to be creative so we don’t end up with multiple buildings of the same name!
- Now click OK, and when it asks you to Create a New Form - answer Yes.
- Now reopen your Building Plan, select the text SimSettlements:SimBuildinPlan under Papyrus scripts, and press the Properties button.
- Double-click Level Stops. Then, on the right hand side, choose Add and type the number 1 in the box labeled Int Value that will appear. Level Stops will be further explained in future tutorials.
- If your building is NOT a commercial type, you can skip this step. Double-click PlotTypeOverride, check the box for Filter and type “kgsim_typecommercial”. After that, in the drop down, select one of the available types - EXCEPT the basic kgSIM_TypeCommercial, which is reserved for special functionality. At the time of this writing, only the seven types exist, the six basic shop types and kgSIM_TypeCommercial_Other, but more will be added in the future.
- Skip StageItemSpawns for now, that will be covered in a future tutorial.
- Double-click StageModels, click Add and then press the letters S and then T on your keyboard. Give the program a second to catch up and the drop down menu should now say Static; if it doesn’t, select it. Now check the box for Filter and type in “kgSIM_BuildingMaterials”. Select whichever building material model sounds best with your building. Note: You can add your own BuildingMaterial models using the same steps used to create your first building model - but for the sake of this tutorial, just use one of the existing ones.
- The first model of StageModels on your Building Plan will be what’s placed before someone starts constructing the building.
- While still under StageModels, click Add and then press the letters S and then T again so Static is selected. Now check the box for Filter and type in part of your building model name. Select your building model from the list. Filtering Tip: If you forget the exact name of your building model, type in that prefix and then a * character; this will bring up all of your models! That wildcard symbol works just like many other search tools and will find anything in place of that * character. For example, if you searched for “kgsim”, you would bring up all of the Sim Settlements’ models, if you wanted to just bring up the clutter models, you could search for “kgsim*clutter”, which would bring up anything with “kgsim” and “clutter” in the name.
- Uniforms is not currently used, but will eventually allow you to determine what clothing and equipment is assigned to the settler that owns your building, if the player has the right unlocks and options set.
- Press OK, then OK again. Building Plan complete! (-ish. Still a lot to do, but this is enough for us to test!)
- Save your mod file.
Testing Your Building Plan On a Plot
Alright, time for all that hard work to start paying off!
- If you’re using a mod management software such as NMM, it should detect your new mod file. In NMM, they can be found under the Plugins tab. Simply check the box next to your mod file to enable it. Also make sure that SimSettlements.esm is checked in.
- Now load into the game and create yourself a new plot in Workshop Mode, then open the console.
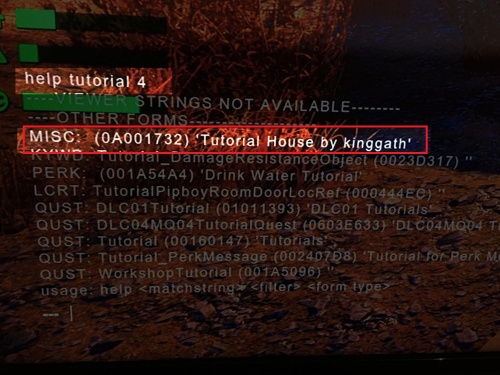
- Type in: help partofthenameofyourbuildingplan 4
- Replacing partofthenameofyourbuildingplan with part of the name field you used on your building plan (not the Editor ID). In the below image, it would be part of the highlighted section.
- This should return the Form ID for your building plan: it will be an 8-digit hexidecimal number.
- Replacing partofthenameofyourbuildingplan with part of the name field you used on your building plan (not the Editor ID). In the below image, it would be part of the highlighted section.
- Now while still in the console, select the plot (click on the utility pole with your mouse) and type:
cf “testbuildingplan” “0A001732” “0”
- If you get an error about “no such script”, then you’ve accidentally clicked something that isn’t a plot. Try selecting the pole again. The number in the top center of the console will change when you’ve selected something new. If you can’t seem to get it, exit the console and try moving your character to view it from a different angle. Once you’ve selected something new in the console, you can press the up arrow on your keyboard to have it retype up the last command you used, so that all you have to do is press Enter.
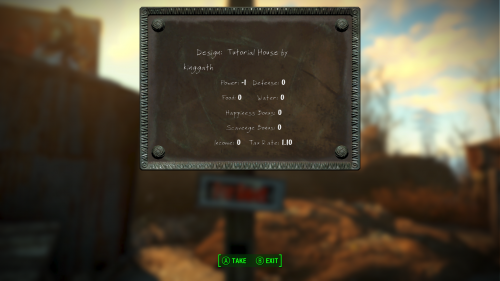
- Include the quotes, replace 0A001732 with the hex number you found with the help command for your model, and the last number is the stage you want to start at. Since we went with 0, the building materials will appear and you can assign a settler to have him build your model!
- For quicker testing in the future, replace the 0 with the stage you’re working on, and you won’t have to wait for a settler. 0 is always the building materials stage, and each one after that counts up from there. So in this tutorial, we only have the building materials, and then the model, so replacing it with 1 will show that model right away.
- If you check the building plaque you should see your building plan name!
- You are now equipped with everything you need to start building models and testing them. The rest of the construction stages and levels follow BASICALLY the same steps. Check out the next tutorial for tips on creating the construction stages and details on setting up the Upgrades.
- There are some slight differences in the building plan Level Stops configuration - so best to check out the next tutorial.


Integrating With Sim Settlements Without The Console Commands
Ok, and now we’re ready for the final touch to make your building plan work with Sim Settlements on its own!
You’re only going to do this section once per building type, and then it will be set up for everything you decide to add to Sim Settlements.
Go back to the Creation Kit. In the Object Window, expand the Character category, then select Quest. Set the Filter to “kgsim_addon”. You’re looking for a quest called kgSIM_AddonTemplate - right-click this and choose Duplicate. Now open the newly created kgSIM_AddonTemplateCOPY0000.
- On the Quest Data tab, change the ID to something unique (as always, remember to start with your prefix!).
- Press OK. If it asks you to Create a new form, answer No, then answer Yes to renaming.
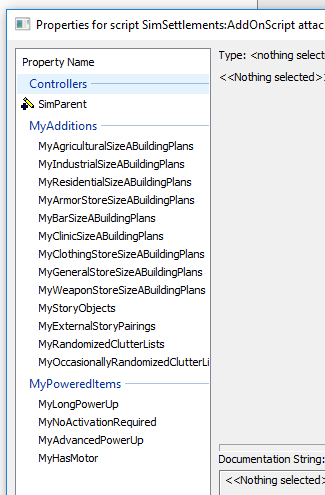
- Next we’re going to prepare some FormLists to hold your building plans. If you know you want to add some of the other things in the list pictured below, you can create those FormLists objects as well.

I’ll show you where you can find this list in the CK shortly. The SizeA refers to the basic plot size that is in version 1 of Sim Settlements. In the future I’ll be adding additional sized plots you all can make use of to create even larger structures! UPDATE: As of version 1.1.0+ of Sim Settlements, the default plot size is called 2x2, which is just a clearer name for SizeA.
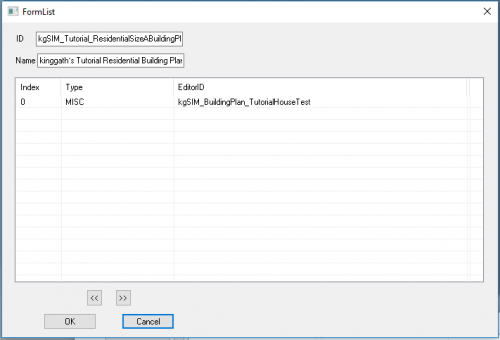
- In the Object Window, expand the Miscellaneous category and click FormList. Then in the right-side of the Object Window, right-click and select New.
- Enter a unique id (prefix!) that is similar to one of the list names above so you can easily find it later and know what it’s going to do. For the tutorial I created a house, so I’m going to go with “kgSIM_Tutorial_ResidentialSizeABuildingPlans”.
- The name is mostly for your benefit: I’ll be going with “kinggath’s Tutorial Residential Building Plans” here.
- Press OK.
- Repeat these steps for each thing you would like to add items to. If you’re not sure, or if you don’t know what one of them is for - you can come back and add more at any time! So just focus on the one that your building plan belongs in.
- While you’re still in the FormLists category, use the Object Window Filter to find the one you want to add your building plan to. So if you built a home, find the list you made for MyResidentialSizeABuildingPlans and double-click it to open it up. Then slide it off to the right a bit and leave it open.
- In the Object Window, expand the Items category, select MiscItem, then Filter for your building plan ID (or YOURPREFIX followed by a * character if you can’t remember exactly what you called it).
- Drag your building plan into the main part of the formlist. It should look like this:
- Press OK.
- Next, in the Object Window, expand the Characters category, then click on Quest, and filter for the quest # you made. Double-click it to open it up.
- On the scripts tab, select SimSettlements:AddOnScript and click Properties.
- Double-click on SIMParent and make sure kgSIM_SIMSettlementParent is selected.
- For each property that you created a form list (this is where that screenshot I showed you in step 3 came from - if I add more things you can control, they will appear here!), double-click it and select the list you created for it. You can use the Filter option to speed up this process.
- For example, double-click MyResidentialSizeABuildingPlans and select your FormList with your Residential building plans.
- Once you’ve filled in the lists you’ve created so far, press OK.
- Press OK again to close the quest.
- Save your plugin.

You’re done!
Your building plan will now automatically inject itself into the Sim Settlements rotation. What’s even better is that Sim Settlements will prioritize models it’s never seen before - so if you have a save with all the vanilla buildings already created, yours will be on deck as the next one created for that plot type!
Now there’s still a lot more to do to make your building fully featured, but you now have the knowledge to create building models and integrate them with Sim Settlements!