Difference between revisions of "User:Infinithil"
Infinithil (talk | contribs) m (→Making Your Custom Flag Art) |
Infinithil (talk | contribs) m |
||
| Line 399: | Line 399: | ||
# If you don’t have a folder called Textures, create it. Then inside of that, create a new folder for your mod. Copy Flag_Diffuse_Template_d.dds to this folder, now rename it something for the first flag you want to create, for consistency sake, make sure it ends in “_d” like the current name.<br/>So if you decide to name it MyFlag, name it MyFlag_d instead. The d stands for diffuse, and represents what most people would consider the texture. | # If you don’t have a folder called Textures, create it. Then inside of that, create a new folder for your mod. Copy Flag_Diffuse_Template_d.dds to this folder, now rename it something for the first flag you want to create, for consistency sake, make sure it ends in “_d” like the current name.<br/>So if you decide to name it MyFlag, name it MyFlag_d instead. The d stands for diffuse, and represents what most people would consider the texture. | ||
# If you don’t have a folder called Materials, create it. Then inside of that, create a new folder for your mod. Copy Flag_Material_Template.BGSM to this folder, now rename it something similar to the texture name you used above for the first flag you want to create. | # If you don’t have a folder called Materials, create it. Then inside of that, create a new folder for your mod. Copy Flag_Material_Template.BGSM to this folder, now rename it something similar to the texture name you used above for the first flag you want to create. | ||
| − | # Open the .BGSM file you just renamed in the [http://www.nexusmods.com/fallout4/mods/3635/ Material Editor] program.<br/>[File: | + | # Open the .BGSM file you just renamed in the [http://www.nexusmods.com/fallout4/mods/3635/ Material Editor] program.<br/>[File:Toolkit Extra Custom Flag Tutorial image01.jpg] |
# Go to the Material tab, then click on the grey box to the far right next to the Diffuse Texture row, and navigate to the DDS file you copied in step 2. Now save the material and exit this program. | # Go to the Material tab, then click on the grey box to the far right next to the Diffuse Texture row, and navigate to the DDS file you copied in step 2. Now save the material and exit this program. | ||
| Line 412: | Line 412: | ||
When the Martial Plot is manned, and flag is up in the air, only the top half of the texture is used on both sides of the flag. When the Martial Plot is not manned, and the flag is down, it uses both halves of the texture. | When the Martial Plot is manned, and flag is up in the air, only the top half of the texture is used on both sides of the flag. When the Martial Plot is not manned, and the flag is down, it uses both halves of the texture. | ||
| − | You’ll be fine copy pasting the top half to the bottom as it’s hard to tell the difference when the flag is down anyway. If you’re a perfectionist, you have the option to do each side separately.<br/>[File:|left|Bottom half of the texture]<br/>[File:|right|Top half of the texture]<br/> | + | You’ll be fine copy pasting the top half to the bottom as it’s hard to tell the difference when the flag is down anyway. If you’re a perfectionist, you have the option to do each side separately.<br/>[File:Toolkit Extra Custom Flag Tutorial image02.jpg|left|Bottom half of the texture]<br/>[File:Toolkit Extra Custom Flag Tutorial image03.jpg|right|Top half of the texture]<br/> |
The erased parts of the texture file are what will show up as holes in the flag.<br/> | The erased parts of the texture file are what will show up as holes in the flag.<br/> | ||
# Once you have your flag designed the way you want, do the following to save the file correctly: | # Once you have your flag designed the way you want, do the following to save the file correctly: | ||
| Line 432: | Line 432: | ||
# Click on File->Data and check in SimSettlements.ESM, then press OK. | # Click on File->Data and check in SimSettlements.ESM, then press OK. | ||
# Once the files are loaded, select the Object Window, and type “kgsim*flag” without the quotes in the Filter box. This will show all of the different Sim Settlements objects related to flags. | # Once the files are loaded, select the Object Window, and type “kgsim*flag” without the quotes in the Filter box. This will show all of the different Sim Settlements objects related to flags. | ||
| − | # Find the object with the name “kgSIM_FlagDown_USA”, right-click it and choose Duplicate and Rename, in the pop-up, type in kgSIM_ in the Search box, and enter your own prefix in the Replace box - it can be whatever you want. You’ll use this prefix to identify all of your custom objects.<br/>[File: | + | # Find the object with the name “kgSIM_FlagDown_USA”, right-click it and choose Duplicate and Rename, in the pop-up, type in kgSIM_ in the Search box, and enter your own prefix in the Replace box - it can be whatever you want. You’ll use this prefix to identify all of your custom objects.<br/>[File:Toolkit Extra Custom Flag Tutorial image04.jpg] |
# Press OK. | # Press OK. | ||
# Now repeat step 4 for “kgSIM_FlagWavingUSA01”, “kgSIM_FlagWallUSA”, and “kgSIM_DynamicFlag_Template”. | # Now repeat step 4 for “kgSIM_FlagWavingUSA01”, “kgSIM_FlagWallUSA”, and “kgSIM_DynamicFlag_Template”. | ||
| Line 444: | Line 444: | ||
## Press OK again, and when prompted to Create a New form select No. You’ll then be prompted to Rename, answer Yes. | ## Press OK again, and when prompted to Create a New form select No. You’ll then be prompted to Rename, answer Yes. | ||
# Repeat step 8 for yourPrefix_FlagWavingUSA01 and yourPrefix_FlagWallUSA. The Wall version will be the exact same steps, and the only difference for the Waving version is that screen will look slightly different, so the Edit button won’t be in the exact same position. | # Repeat step 8 for yourPrefix_FlagWavingUSA01 and yourPrefix_FlagWallUSA. The Wall version will be the exact same steps, and the only difference for the Waving version is that screen will look slightly different, so the Edit button won’t be in the exact same position. | ||
| − | # Double-click yourPrefix_DynamicFlag_Template. This is going be your Dynamic Flag Record.<br/>[File: | + | # Double-click yourPrefix_DynamicFlag_Template. This is going be your Dynamic Flag Record.<br/>[File:Toolkit Extra Custom Flag Tutorial image05.jpg] |
## In the ID field, erase “Template” and replace it with your flag name. | ## In the ID field, erase “Template” and replace it with your flag name. | ||
## In the Name field, erase “Dynamic Flag” and replace it with what you want the player to see when choosing your flag from the list. | ## In the Name field, erase “Dynamic Flag” and replace it with what you want the player to see when choosing your flag from the list. | ||
| Line 481: | Line 481: | ||
# While you’re still in the FormLists category, change the Filter in the Object Window to your prefix and double-click the FormList you just created and drag it off to the side. | # While you’re still in the FormLists category, change the Filter in the Object Window to your prefix and double-click the FormList you just created and drag it off to the side. | ||
# In the Object Window, expand the Items category, select MiscItem. | # In the Object Window, expand the Items category, select MiscItem. | ||
| − | # Drag your Dynamic Flag Record into the main part of the formlist. It should look like this:<br/>[File: | + | # Drag your Dynamic Flag Record into the main part of the formlist. It should look like this:<br/>[File:Toolkit Extra Custom Flag Tutorial image07.jpg] |
# Press OK. | # Press OK. | ||
# Next, in the Object Window, expand the Characters category, then click on Quest, and filter for your prefix to find the quest you made. Double-click it to open it up. | # Next, in the Object Window, expand the Characters category, then click on Quest, and filter for your prefix to find the quest you made. Double-click it to open it up. | ||
Revision as of 11:13, 11 February 2018
Greetings, you people!
My name is Infinithil, I am from Germany and work as a civil servant.
In my free time, I work on my first addon pack for SimSettlements and help around the SimSettlements Wiki.
Have a nice day!
Last finished: Toolkit Extra - Advanced Possibilities
Workshop area
Toolkit Extra - Branching Building Plans
This tutorial assumes you know basic navigation and keyboard shortcuts to navigate the Creation Kit. If not, please go back and check out the Creation Kit 101 primer.
All of my guides will highlight things that are specific to your experience level: Green for beginners, and Red for seasoned modders. So if you’re new, you aren’t meant to understand the red messages, and if you’re a vet - you can probably skip the green.
Contents
- 1 Preamble
- 2 Master Building Plans
- 3 Building Paths
- 4 Building Path Plans
- 5 Tech Trees (Bringing it All Together)
- 6 Testing Your Branching Plans
- 7 Registering Your Branching Plans With Sim Settlements
- 8 Using the Stockpile System For Upgrades
- 9 You’re Done!
- 10 Programs Needed
- 11 Setting Up Your Files/Directories
- 12 Making Your Custom Flag Art
- 13 Configuring Your Flag
- 14 Adding Your Flag to Sim Settlements
- 15 You’re done!
Preamble
This guide assumes you’ve completed all of the previous tutorials and feel very comfortable with creating building plans. It also assumes you have played with the Advanced Industrial plot introduced with the Industrial Revolution expansion, and understand how they work in the game.
There are three ways to make use of Branching Building Plans, one of the methods requires much less work than the others and will be described at the end, the last is very complex and lets you generate the entire branching plan from scratch, and the second option is somewhere in-between.
It’s important you understand how the entire system works before applying any of the methods. So even though this will include steps along the way (for organizational purposes), it’s recommended you read through the entire guide once and then come back through to build your plans once you’re certain which of the two methods makes more sense for you.
Master Building Plans
A Master Building Plan uses the same script as a normal building plan, but only uses a single property (for compatibility reasons it had to be derived from the same script or the framework’s inheritance system would no longer function correctly). The BuildingPlanPaths will be set to a Form List to hold all possible paths this plot can take once it makes use of this building plan. This represents the complex method described in the Preamble, and will only be needed if you will be creating an entirely new Tech Tree (explained ahead).
The Industrial Revolution Master Plans have other fields filled out, but you can ignore those - it was for testing only.
To set up a Master Building Plan follow these steps:
- In the Object Window, expand Miscellaneous, click on FormList, then in the right-hand side, right-click and choose New.
- Set your FormList ID field to something to represent this “tech tree” path list.
- In the Object Window, expand Items and click on MiscItem. Then filter for “master”.
- Duplicate the kgSIM_MasterBuildingPlan_Template.
- Open your new master plan and change the ID field of your duplicate to a name that represents this “tech tree” Master Plan.
- Select the SimSettlements:SimBuildingPlan script and click Properties.
- Add an entry to the LevelStops property for each level your building has, the value of each can be 0. For most building plans, you’ll have three entries - though certain exceptions exist (such as Agricultural which can support 4 levels at the time of this writing - assuming you were making a branching agricultural plan).
- Expand the Advanced section (double click it), and point the BuildingPlanPaths property to your new formlist.
- Press OK, then OK again, when asked to Create a new form, click No, then click Yes to the prompt asking if you’d like to Rename the form.
Building Paths
Consider a Building Path like the Commercial Building subtypes, but rather than being pre-defined like Commercial are, these allow you to create custom subtypes for different building plans to belong to.
In the Creation Kit, Building Paths are similar to the Building Plans you’ve been creating in that they are items you create to define certain features about them. These Path objects are what allow a building to have multiple variations at each level of a plot.
To start, I’ll give an idea of what each of the fields of a Building Plan Path object do, many of these fields are optional and provide you advanced options and possibilities. They will all make more sense at the end of the tutorial. Feel free to breeze past this next section and treat it as reference guide later on.

ActiveUnlocks: [Optional] An array of GlobalVariables, all entries here will be incremented by 1 when the plot completes construction of this path and then decremented by 1 if the plot has it’s building plan changed or the plot is destroyed. These can be used to give the player access to something only while this plot exists.
BaseUpgradeMaterials: [Optional]' An array of items and corresponding quantities. When configured, these are the objects the plot must stockpile in order to upgrade out of this path. The items and quantities should generally be similar to those generated via the CreateResources property.
BuildingPlans: This is a formlist of the building plans that represent this path. This allows multiple building plan variations to be used on the same path - these essentially act as “alternate art” variations without requiring all of the complex setup of a path.
CreateResources: [Optional] This is a LeveledItem that will be generated every day in the workbench AND the stockpile. If the building is eligible for upgrade (meaning the player has Upgrades Advanced set to Manual and hasn’t triggered an upgrade on the plot) or the plot is at max level, the workbench share AND the stockpile share will be placed in the workbench. Effectively doubling the output under those circumstances.
ExtraUpgradeCosts: [Optional] Similar to the BaseUpgradeMaterials setting, this instead adds an extra cost the player/stockpile must pay BEFORE the plot can upgrade to this path.
PathKeyword: This keyword should be unique for this path, it’s used to ensure a plot can’t jump between different paths that are unrelated at each level.
PermanentUnlocks: [Optional] Similar to the ActiveUnlocks, these are a set of globals. When this path has completed construction, all of the globals set here are changed to 1. If the plot plan is changed or destroyed, these globals will not be reverted. These can be used to give the player access to something forever after this path has been constructed.
Requirement_Level: This is the level a plot must be at to use this path. Note that this is the level the plot is CURRENTLY at, not the level it will be after construction completes. So if this is the initial path a building plan would follow, the Requirment_Level would be 0.
Requirement_OwnerAVToCheck: [Optional] ActorValues that must be equal to the corresponding Requirement_OwnerAVValue field on the plot owner in order for this path to be eligible. This will allow arranging certain paths to only be available to certain NPCs. This is an array and Requirement_OwnerAVValue must have the exact same number of entries.
Requirement_OwnerAVValue: [Optional] Number the corresponding Requirement_OwnerAVToCheck ActorValue must be equal to on the plot owner for this path to be eligible. This will allow arranging certain paths to only be available to certain NPCs. This is an array and Requirement_OwnerAVToCheck must have the exact same number of entries.
Requirement_PreviousPathKeywords: This is an array of Keywords that should be set in ascending order for each of the other paths the plot should have gone through in order to be eligible for this path. They will be entries you used on other Building Plan Paths in the PathKeyword field.
Requirement_WorkshopAVToCheck: [Optional] ActorValues that must be greater than or equal to the corresponding Requirement_WorkshopAVValue field on the settlement in order for this path to be eligible. This will allow arranging certain paths to only be available if specific conditions are met in that settlement. This is an array and Requirement_WorkshopAVValue must have the exact same number of entries.
Requirement_WorkshopAVValue: [Optional] Number the corresponding (?)
UnlockMessage: [Optional] A special message to display to the player when this path finishes construction.
WorkshopAVsToSet: ActorValues to increment on the settlement, these values will be incremented when the path finishes construction and decremented if the plot plan changes or the plot is destroyed. When used in conjunction with the Requirement_WorkshopAV settings on other plans, you can easily set up requirements so that a path can require a certain number of other specific paths exist in the settlement before it becomes eligible. This is how the Tech Tree system is accomplished in Industrial Revolution. Technically this is optional, but it’s highly recommended you set it up because if you change your mind later, your players’ existing plots using this path won’t be able to set the value without being completely rebuilt.
To create a new Building Path, follow these steps:
- In the Object Window, expand Miscellaneous, click on FormList, then in the right-hand side, right-click and choose New.
- Change the ID field of your FormList to something to represent this path’s building plans.
- In the Object Window, expand Miscellaneous, click on Keyword, then in the right-hand side, right-click and choose New.
- Change the ID field of your Keyword to something to represent this path.
- [Optional but Highly Recommended] In the Object Window, expand Miscellaneous, click on ActorValue, then in the right-hand side, right-click and choose New.
- [Optional but Highly Recommended] Change the ID field of your ActorValue to something to represent this path.
- In the Object Window, expand Items and click on MiscItem. Then filter for “BuildingPlanPath”.
- Duplicate the kgSIM_BuildingPlanPath_Template.
- Open your new building plan and change the ID to something to represent this path.
- Select the SimSettlements:SimPlanPath script and click Properties.
- Point the BuildingPlans property to your new Formlist.
- Point the PathKeyword property to your new Keyword.
- [Optional but Highly Recommended] Add your new ActorValue as well as the actorvalues of any previous paths this plot would have had to set in order to get to this path to the WorkshopAVsToSet property. This will allow the plot to count towards any requirements of this path type so that the player doesn’t lose access to an unlocked tech tree if their building upgrades.
- If this is path is meant to be used as an upgrade and not a starting path, add the PathKeywords for the previous level paths, in order, to the Requirement_PreviousPathKeywords property.
- Set the Requirement_Level to the level number the plot should be at in order to use this path (if this is a starting path - this should be 0).
- Press OK to close the properties, then OK again to close the Building Plan object.
- If this Path is part of your Master Plan, continue to step 18 OR If this is meant to add new options to the Sim Settlements tech trees, go to the Register Your Branching Plans with Sim Settlements subsection titled - Forking Existing Tech Trees. Do NOT manually add your path to a Sim Settlements default form list, you must use the Addon Quest to do so (see the Register Your Branching Plans with Sim Settlements section).
- Open the FormList that your Master Plan is using as its BuildingPlanPath property and add the Building Path object you just created to it.
- Press OK to close the FormList.
Building Path Plans
A Building Path Plan, is a building plan just like you’ve always built, except that it only has one level. Everything else about it is identical to the standard building plans you created in the other tutorials.
You can have as many Building Path Plans as you like for each Building Path. Going back to the Commercial analogy, imagine the Building Path is the subtype, and the Building Path Plan is the custom plan for that subtype that holds the building art and spawned objects the player will see.
If you’re looking to contribute your plan to an existing Sim Settlements Building Path, check out the Registering Your Branching Plans With Sim Settlements subsection Option 1 - Alternate Plans OR if this is for your own path, open the FormList in your Building Path’s BuildingPlans property and add this plan to it.
Note: It’s completely OK to have a single Building Path Plan in this formlist.
Do NOT manually add your plans to a Sim Settlements default form list, you must use the Addon Quest to do so (see the Register Your Branching Plans with Sim Settlements section).
Tech Trees (Bringing it All Together)
Consider the below diagram which represents one of the “Tech Trees” from Industrial Revolution.

This is a visual representation of 7 building paths that are all connected using a Master Plan and Building Path objects to create a Tech Tree. Note that your tech trees may have more branches at any level, this particular tech tree just happens to have two branches to choose from at each upgrade level.
As of Sim Settlements 2.1.3, there is now a visual Tech Tree interface!
To support the visual Tech Tree interface, you’ll want to fill out the following fields on your Building Path Plans:
- TechTreeName: This should be a short name for your building plan that will actually show up on the Tech Tree, you’ll want to experiment in game to confirm if the full name of your building will fit.
- UnlockedBy: [Optional] If the Building Path this plan is part of requires something outside of the tree this will appear on, you should put a very short explanation of that here. For example, the Chemical Plant on the Water Tech Tree in Industrial Revolution requires the Medical Grade Plastics building from the Oil Tech Tree, so the UnlockedBy field says “Medical Plastics”. If your requirement is only the building path before this one, you should leave the UnlockedBy field blank, because the visual tech tree will make it very obvious.
- iIconID: This is a small icon to visually represent your building plan. You should enter the number that corresponds to the image you’d like to represent your plan. The below images shows the available icons and their corresponding icon ids just below. If you would like to have custom icons added to Sim Settlements, please find or create a single-color vector graphic in a similar art style to these and send it to kinggath for implementation.

To explain the building path system in more detail, we’ll go over how the building path objects would be set up to create the Wood Tech Tree pictured in the first diagram of this section, while you can easily check this in the Creation Kit, this will also provide notes with the some properties to help clarify why each is set the way it is, look for these notes in italics .
Wood:
BuildingPlans = kgSIM_IndA_Path_BuildingPlans_Wood_L0_Base
Industrial Revolution used the naming scheme ending in “Base” to represent the starting point of all buildings in the Tech Tree.
PathKeyword = kgSIM_BuildingPlanPath_Industrial_Wood_L0_Base
Requirement_Level = 0
We only want a fresh plot to be able to use this path, a plot without a completed structure on it is considered level 0.
Requirement_PreviousPathKeywords = <<Default: []>>
Since this is a starting path, it doesn’t have any previous paths required.
WorkshopAVsToSet = kgSIM_PlotsPresent_Wood Industrial Revolution uses this so that other paths can check for certain paths present in a settlement. When this plot finishes building this path, this setting will tell other plots that there is at least 1 wood-producing plot present in the settlement.
Paper:
BuildingPlans = kgSIM_IndA_Path_BuildingPlans_Wood_L1_PaperPath
PathKeyword = kgSIM_BuildingPlanPath_Industrial_Wood_L1_PaperPath
Requirement_Level = 1
This path should only be available if the plot attempting to use it is at level 1 at the time it tries to upgrade.
Requirement_PreviousPathKeywords = kgSIM_BuildingPlanPath_Industrial_Wood_L0_Base
We only want plots that were the Wood path at level 1 to be able to upgrade to this, so we use the PathKeyword from the Wood Building Path as configured above.
WorkshopAVsToSet = kgSIM_PlotsPresent_Wood AND kgSIM_PlotsPresent_PaperPath
In order to prevent building upgrades from having breaking tech tree requirements, we include the previous path’s AV as well. That way this plot will count as both a Wood and Paper type, which prevents the player from having to constantly re-build earlier level versions of things in order to maintain tech requirements.
Magazines:
BuildingPlans = kgSIM_BuildingPlanPath_Wood_L2_PaperPath_Military
The final level paths for Industrial Revolution were originally conceived as being a military focused use of the product (helping the player) or a civilian focused use (helping the settlement). You do not have to follow this paradigm, it was just how the Industrial Revolution used the system.
PathKeyword = kgSIM_BuildingPlanPath_Industrial_Wood_L2_PaperPath_Military
Requirement_Level = 2
This path should only be available if the plot attempting to use it is at level 2 at the time it tries to upgrade.
Requirement_PreviousPathKeywords = kgSIM_BuildingPlanPath_Industrial_Wood_L0_Base, kgSIM_BuildingPlanPath_Industrial_Wood_L1_PaperPath
This time we want the plot to have followed a very specific upgrade path. It needs to have started as a kgSIM_BuildingPlanPath_Industrial_Wood_L0_Base type, and then upgraded to a kgSIM_BuildingPlanPath_industrial_Wood_L1 Paper type in that specific order before it can be eligible to use this path.
WorkshopAVsToSet = kgSIM_PlotsPresent_Wood AND kgSIM_PlotsPresent_PaperPath AND kgSIM_PlotsPresent_PaperPath_Military
News:
BuildingPlans = 'kgSIM_BuildingPlanPath_Wood_L2_PaperPath_Civilian
PathKeyword = kgSIM_BuildingPlanPath_Industrial_Wood_L2_PaperPath_Civilian
Requirement_Level = 2
Requirement_PreviousPathKeywords = kgSIM_BuildingPlanPath_Industrial_Wood_L0_Base, kgSIM_BuildingPlanPath_Industrial_Wood_L1_PaperPath
Notice that this has the exact same requirements as the Magazines path, because the PaperPath can branch off into either this, or the Magazines path.
WorkshopAVsToSet = kgSIM_PlotsPresent_Wood AND kgSIM_PlotsPresent_PaperPath AND kgSIM_PlotsPresent_PaperPath_Civilian
Coal:
BuildingPlans = kgSIM_IndA_Path_BuildingPlans_Wood_L1_CoalPath
PathKeyword = kgSIM_BuildingPlanPath_Industrial_Wood_L1_CoalPath
Requirement_Level = 1
Requirement_PreviousPathKeywords = kgSIM_BuildingPlanPath_Industrial_Wood_L0_Base
This has the same requirement as the PaperPath because it could also come from the Wood path.
WorkshopAVsToSet = kgSIM_PlotsPresent_Wood AND kgSIM_PlotsPresent_CoalPath
Flares:
BuildingPlans = kgSIM_BuildingPlanPath_Wood_L2_CoalPath_Military
PathKeyword = kgSIM_BuildingPlanPath_Industrial_Wood_L2_CoalPath_Military
Requirement_Level = 2
Requirement_PreviousPathKeywords = kgSIM_BuildingPlanPath_Industrial_Wood_L0_Base, kgSIM_BuildingPlanPath_Industrial_Wood_L1_CoalPath
WorkshopAVsToSet = kgSIM_PlotsPresent_Wood AND kgSIM_PlotsPresent_CoalPath AND kgSIM_PlotsPresent_CoalPath_Military
Coal Power:
BuildingPlans = kgSIM_BuildingPlanPath_Wood_L2_CoalPath_Civilian
PathKeyword = kgSIM_BuildingPlanPath_Industrial_Wood_L2_CoalPath_Civilian
Requirement_Level = 2
Requirement_PreviousPathKeywords = kgSIM_BuildingPlanPath_Industrial_Wood_L0_Base, kgSIM_BuildingPlanPath_Industrial_Wood_L1_CoalPath
WorkshopAVsToSet = kgSIM_PlotsPresent_Wood AND kgSIM_PlotsPresent_CoalPath AND kgSIM_PlotsPresent_CoalPath_Civilian
Testing Your Branching Plans
For testing the building plans visually, you can continue to use the existing method for basic plans by using the console command
cf testbuildingplan XXXXXXX 0
Replacing the X’s with the form ID of your Building Path Plan.
To test that your entire branching plan is configured correctly, you have two options.
- If you’ve already registered with Sim Settlements (described in the next section), this method is very easy to understand, but takes much longer to test the higher level paths as you have to go through the previous paths first. When using this method, you’ll want to create a save before each test, that way if it fails, you can make changes and then load that save again without having to go through the earlier phases again.
- Start by changing the holotape option Upgrade Advanced to Manual.
- Now run this console command on your plot: setpv bIsUpgradeReady true
This will flag your plot as being eligible for an upgrade so you can access the plot menu options, choose Upgrade Building and select the path you’re looking to test.
- This method simulates to the code that your building went through all of the appropriate paths. It’s more complicated to understand, will take more setup up front as you’ll need to look up and write down all of the keyword form IDs, but is quicker for each individual test - so it’s worth learning.
Use the same command as above, except after the 0, add a space and then the form IDs for the path keywords of each of the paths involved. For example, to test the Flare building in our example above, you would use the command:
cf testbuildingplan XXXXXXX 0 YYYYYYYY ZZZZZZZZ WWWWWWW
Replacing the X’s with the plan form ID you want to test, the Y’s, Z’s with the Requirement_PreviousPathKeyword form IDs and the W’s with the Flare path’s PathKeyword ID. If you’re testing an earlier level, you would ignore an argument for each level earlier. For example, to just test the Wood path, you could skip the Z’s and W’s.
Registering Your Branching Plans With Sim Settlements
Throughout this tutorial, I’ve mentioned multiple methods of working with Branching plans. Now that you’ve seen the various pieces of the whole process, the methods should make a little more sense. Though calling them methods is kind of a misnomer, in reality these are very different things, but they allow you to contribute to the branching building path system.
The actual registering with Sim Settlements part is very easy, but the option you choose determines the steps from the previous sections you’ll need to do to create your idea.
Option 1 - Alternate Plans
If you have a single building plan idea, that would work well with an existing Building Path in Sim Settlements, you can contribute it without having to create new Building Path or Master Plan objects (for example, say you’d like to build your own building that provides Wood, it would make sense to add it to the Sim Settlements Wood Path). When the player has a plot that’s eligible for the path you’re contributing a plan to, your plan will be included as one of the options.
IMPORTANT: Do NOT set up the ResourcesGenerated field on your plan if contributing to Level 1 or Level 2 Sim Settlements paths on Advanced Industrial plots unless you ensure that your LeveledItem entry will be creating the resources configured in the path you’re contributing to’s BaseUpgradeMaterials entry (see the Using the Stockpile System For Upgrades). This will create a situation where it’s nearly impossible for those to upgrade as they require generating specific resources, which your plan will override.
- After building your single level Building Path Plan, open your Addon Quest.
- Select the SimSettlements:AddonScript script and click Properties.
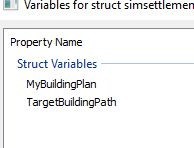
- Expand the MyTechTreeAdditions Add a new entry to the MyBuildingPathAddons property.
- A secondary properties window will come up with two fields, each of these fields is a drop-down menu that will detect the correct types automatically so you don’t have to dig through all of the various object types described in this tutorial.
- Set the MyBuildingPlan property to your building plan form.
- Set the TargetBuildingPath property to the Sim Settlements building path you want your plan to a part of.
- Press OK on these two screens to exit the property windows, then Press OK on your Addon quest.

Option 2 - Forking Existing Tech Trees
If you have an idea for a new path that would work well with an existing Sim Settlements Tech Tree, you can add it without having to create an entire Master Plan worth of building paths and plans. You’ll only need to create that path and the levels to follow it.
For example, if you were adding an alternate path for the PaperPath to follow instead of Magazines or News, you would only need to create a single Building Path and Building Path Plan.
Or if you wanted to create an alternate path for Wood to follow instead of Paper and Coal at level 2, you would create your new Building Path and Building Path Plan(s), followed by one or more pairs of Paths and Path Plans for your new path to follow at level 3.
When creating your new alternate path, be sure to set up the appropriate Required_PreviousPathKeywords to match other paths at that same level.
- After creating your Building Path and Building Path Plan objects, and adding the plan(s) to the corresponding formlists of your custom paths, open your Addon Quest.
- Select the SimSettlements:AddonScript script and click Properties.
- Expand the MyTechTreeAdditions Add a new entry to the MyBuildingPathForks property.
- A secondary properties window will come up with two fields.
- Set the TargetMasterPlan property to the appropriate Master Building Plan you want your path to be a part of. Since the Master Building Plans use the same core script, look for the ones that start with kgSIM_MasterPlan.
- Set the MyBuildingPath property to your Path object.
- If your forked path was a level 2, you’ll need to repeat steps 3 and 4 for each of your level 3 paths that it leads to. All paths that a plot should go through must be part of the Master Plan or they won’t function.
Option 3 - Custom Tech Trees
If you’re creating an entire Master Plan of your own, you register it the same way you would a normal building plan and add it to the Formlist you have configured for that plot type.
Using the Stockpile System For Upgrades
If you’re looking to make use of the Stockpile system the way the Level 1 and Level 2 Advanced Industrial buildings in Industrial Revolution do, you need to set up the BaseUpgradeMaterials and CreateResources properties, and you need to do so in a way that two will work together.
The CreateResources property holds a LeveledItem, the same way a Building Plan’s ResourcesGenerated property does. It works identically, but is also overwritten by it. So if a Building Path Plan has the ResourcesGenerated property set up, and it’s Path has the CreateResources property set up, the Plan level will take precedence. This is important to understand when configuring the BaseUpgradeMaterials.
BaseUpgradeMaterials is an array that consists of pairs of items and quantities. These represent the stuff the plot must have in its stockpile before it can upgrade from the current plan to something else. When this path completes construction, it will add a single item of each type set in this property to the stockpile, this is to ensure the player knows what type of materials the building needs to stockpile for upgrades, in case they’d like to make donations and speed up the process.
The quantity of each entry will be multiplied by twice the number of days it takes that plot to upgrade. So if the BaseUpgradeMaterials had an entry of 10 Wood and 20 Steel, and the plot’s upgrade time for that level was 5 days, the Stockpile would need to have 100 Wood and 200 Steel before it would be eligible to upgrade. (10 Wood * 5 Days * 2 = 100, 20 Steel * 5 Days * 2 = 200). The numbers were designed so that if the player “gives back” everything that the plot produced in their workshop to the stockpile, the plot will take approximately the same amount of time as a normal plot to upgrade - but if instead they keep the materials, the plot will take twice as long as a normal plot to upgrade.
If the CreateResources or ResourcesGenerated entries don’t create the materials expected by BaseUpgradeMaterials, the plot will effectively be incapable of an automatic upgrade and will require player contribution. This will break the player’s expectation of how Sim Settlements works and is not advised, in general, you should make sure that any of your building paths and plans can generate the resources set in the paths’s BaseUpgradeMaterials.
Determining BaseUpgradeMaterials
For Industrial Revolution, I stuck with the most abundant resource generated and chose the highest possible quantity the CreateResources LeveledItem could create. For example, the Lumber Yard can generate a varying amount between 10 and 20 wood per day, so for the BaseUpgradeMaterials I set to 20 Wood. This ensures that the plot will always take at least twice as long as the upgrade period to generate the necessary material.
If I had set it to 10 Wood instead, and the plot “rolled” high on the daily wood multiple times, the plot could upgrade much faster than expected and dilute one of the penalties to differentiate basic and advanced plots.
Testing That The Stockpile Works
The easiest way to test that your stockpile related settings are working, is to do the following:
- Change Upgrades Advanced to Manual in your holotape.
- Change Citizen Needs Requirement to OFF in your holotape.
- Under Notification Settings, disable the Crash Watch notification (we’re about to do something that will trigger it a lot).
- Run the console command: set timescale to 200
This will change the days to run 10 times faster so you’ll know in a few minutes if your resources are generating in the stockpile of the plot.
Once you’ve confirmed the appropriate resources are being added to the stockpile, use the console to add yourself enough of that resource to pay the Upgrade cost based on the formula described above and BaseUpgradeMaterials you set.
Place that resource in the Stockpile and then wait until the appropriate number of days have passed (the time requirements can be found here: https://simsettlements.com/web/wiki/index.php?title=Breakdown). Remember that your timescale is set incredibly high, so you can wait in real-time, or sleep.
Confirm that the Upgrade Building option appears on the ASAM Sensor menu. At this point, the Stockpile should have a large chunk taken out as the process of making a building eligible to upgrade consumes the appropriate amount of resources from the stockpile.
When you’re done testing, be sure to restore your timescale (the default value is 20).
You’re Done!
You should now have the knowledge to integrate with, or create your own, Branching Building plans. These special plans are incredibly powerful (and equally complex), and they can be expanded indefinitely. So you can continue to add more paths and plans in any combination.
Many of the optional features, should provide the tools you need to set up complex requirements and linked technology trees. Be sure to check out the Industrial Revolution paths for examples, as many of them are configured to make use of these various features.
Toolkit Extra - Custom Flag Tutorial
All of my guides will highlight things that are specific to your experience level: Green for beginners, and Red for seasoned modders. So if you’re new, you aren’t meant to understand the red messages, and if you’re a vet - you can probably skip the green.
If you’ve never built a mod or used the Creation Kit before, it’s recommended that you go through the Sim Settlements Builder’s Toolkit. Even if you aren’t interested in creating buildings for Sim Settlements, it teaches you the basics of the Creation Kit and shows you how to package and upload a mod.
This tutorial will go over adding custom flags to the Sim Settlements system. It does not cover photo-editing techniques, only the steps needed to convert an image into a custom flag for use with Sim Settlements.
If you already have a mod with custom flags, and you’d like to integrate them without making Sim Settlements a dependent mod, please contact me and I’d be happy to show you the steps required.
Programs Needed
Gimp or Photoshop
Gimp DDS Plugin or Intel TextureWorks Plugin
Material Editor by Ousnius
Creation Kit (or XEdit, though this tutorial will only show the steps in the Creation Kit)
Sim Settlements 2.0.8 + (make sure you have the mod installed as it includes scripts you’ll need)
Used in this tutorial are several files:
Flag_Material_Template.BGSM - which tells the game which texture files to use.
Flag_Diffuse_Template_d.dds - which is the art texture file.
And two optional files, that you most likely won’t need unless you’re a 3d artist. Most people will just want to use the game’s default files for these.
Flag_Diffuse_Template_n.dds - which is the normal map
Flag_Diffuse_Template_s.dds - which is the specular map
Download the full Builder's Toolkit to get the files.
Setting Up Your Files/Directories
- Go into your Fallout 4/Data folder, this is usually found under C:/Program Files(x86)/Steam/steamapps/common. This is where your game files exist.
- If you don’t have a folder called Textures, create it. Then inside of that, create a new folder for your mod. Copy Flag_Diffuse_Template_d.dds to this folder, now rename it something for the first flag you want to create, for consistency sake, make sure it ends in “_d” like the current name.
So if you decide to name it MyFlag, name it MyFlag_d instead. The d stands for diffuse, and represents what most people would consider the texture. - If you don’t have a folder called Materials, create it. Then inside of that, create a new folder for your mod. Copy Flag_Material_Template.BGSM to this folder, now rename it something similar to the texture name you used above for the first flag you want to create.
- Open the .BGSM file you just renamed in the Material Editor program.
[File:Toolkit Extra Custom Flag Tutorial image01.jpg] - Go to the Material tab, then click on the grey box to the far right next to the Diffuse Texture row, and navigate to the DDS file you copied in step 2. Now save the material and exit this program.
If you are going to be creating custom normal and specular maps, you would link those files here.
Making Your Custom Flag Art
Open the DDS file you copied into your directory in Gimp or Photoshop.
[File:
The flag art is made up of two images that look mostly identical, and for the most part you would fine using the same image on top and bottom. Though they are used slightly differently.
When the Martial Plot is manned, and flag is up in the air, only the top half of the texture is used on both sides of the flag. When the Martial Plot is not manned, and the flag is down, it uses both halves of the texture.
You’ll be fine copy pasting the top half to the bottom as it’s hard to tell the difference when the flag is down anyway. If you’re a perfectionist, you have the option to do each side separately.
[File:Toolkit Extra Custom Flag Tutorial image02.jpg|left|Bottom half of the texture]
[File:Toolkit Extra Custom Flag Tutorial image03.jpg|right|Top half of the texture]
The erased parts of the texture file are what will show up as holes in the flag.
- Once you have your flag designed the way you want, do the following to save the file correctly:
- Gimp: Choose File -> Export As, in the window that pops up, select the file you are editing, then press Export. A second window will come up with DDS settings.
- Set Compression to BC3 /DXT5
- Change Mipmaps to Generate mimmaps
- Press OK.
- Photoshop: Choose File -> Save As, in the Save As Type dropdown, select Intel Textureworks, click Save. A second window with come up with DDS settings.
- Change Texture Type to Color + Alpha
- Set Compression to BC3 8bpp (Linear)
- Set Mip Maps to Auto Generate.
- Press OK.
- Gimp: Choose File -> Export As, in the window that pops up, select the file you are editing, then press Export. A second window will come up with DDS settings.
Configuring Your Flag
This portion uses the Creation Kit, it will be written as if you’ve never used it before, but you may want to go through a basics tutorial, such as the one included in the Sim Settlement’s Builder’s Toolkit.
- Open the Creation Kit.
- Click on File->Data and check in SimSettlements.ESM, then press OK.
- Once the files are loaded, select the Object Window, and type “kgsim*flag” without the quotes in the Filter box. This will show all of the different Sim Settlements objects related to flags.
- Find the object with the name “kgSIM_FlagDown_USA”, right-click it and choose Duplicate and Rename, in the pop-up, type in kgSIM_ in the Search box, and enter your own prefix in the Replace box - it can be whatever you want. You’ll use this prefix to identify all of your custom objects.
[File:Toolkit Extra Custom Flag Tutorial image04.jpg] - Press OK.
- Now repeat step 4 for “kgSIM_FlagWavingUSA01”, “kgSIM_FlagWallUSA”, and “kgSIM_DynamicFlag_Template”.
- In the Object Window, replace the Filter field with the prefix you used for your three objects.
- Double-click yourPrefix_FlagDown_USA.
- In the ID field, erase “USA” and give the flag a name.
- Click on the Edit button near the center of the window. This will bring up the model selection screen.
- Use the Material Swap dropdown menu to select Custom Material Swap.
- In the large white section with the headings “Original Material”, “Replacement Material”, and “Remap Index”, double-click the white area under Replacement Material next to “clothflag01alpha.bgsm”.
- Navigate to materials folder you created at the beginning of this guide and select your .BGSM file, and press OK.
- Press OK again, and when prompted to Create a New form select No. You’ll then be prompted to Rename, answer Yes.
- Repeat step 8 for yourPrefix_FlagWavingUSA01 and yourPrefix_FlagWallUSA. The Wall version will be the exact same steps, and the only difference for the Waving version is that screen will look slightly different, so the Edit button won’t be in the exact same position.
- Double-click yourPrefix_DynamicFlag_Template. This is going be your Dynamic Flag Record.
[File:Toolkit Extra Custom Flag Tutorial image05.jpg]- In the ID field, erase “Template” and replace it with your flag name.
- In the Name field, erase “Dynamic Flag” and replace it with what you want the player to see when choosing your flag from the list.
- Select the SimSettlements:DynamicFlag script and click the Properties button.
- Double-click FlagDown.
- Select Static from the Form Type dropdown (there may be a slight delay before the Creation Kit response).
- Check in the Filter box and type in your prefix.
- Select your flag down model from the Pick Object dropdown.
- Double-click FlagWall.
- Select Static from the Form Type dropdown (there may be a slight delay before the Creation Kit response).
- Check in the Filter box and type in your prefix.
- Select your flag wall model from the Pick Object dropdown.
- Double-click FlagUp.
- Select MoveableStatic from the Form Type dropdown.
- Check in the Filter box, your prefix should be there already (type it in if not).
- Select your flag model from the Pick Object dropdown.
- Press OK to exit the properties screen.
- Press OK to exit the MiscItem screen, when prompted to Create a new form, select No. Then press Yes when asked to rename.
Adding Your Flag to Sim Settlements
If you already have an add-on pack, you can use your existing Quest during this setup.
Now that you have a flag configured, you’re going to tell Sim Settlements about it.
You’re only going to do this section once, after which, you’ll only need to add additional flags to the form list you’ll configure in this section.
In the Object Window, expand the Character category, then select Quest. Set the Filter to “kgsim_addon”. You’re looking for a quest called kgSIM_AddonTemplate - right-click this and choose Duplicate. Now open the newly created kgSIM_AddonTemplateCOPY0000.
- On the Quest Data tab, change the ID to something unique (as always, remember to start with your prefix!).
- Press OK. If it asks you to Create a new form, answer No, then answer Yes to renaming.
- Next we’re going to prepare a FormList for holding your Flag(s).
- In the Object Window, expand the Miscellaneous category and click FormList. Then in the right-side of the Object Window, right-click and select New.
- Enter a unique id (remember to start with your prefix), for example: yourPrefix_FlagList
- Press OK.
- While you’re still in the FormLists category, change the Filter in the Object Window to your prefix and double-click the FormList you just created and drag it off to the side.
- In the Object Window, expand the Items category, select MiscItem.
- Drag your Dynamic Flag Record into the main part of the formlist. It should look like this:
[File:Toolkit Extra Custom Flag Tutorial image07.jpg] - Press OK.
- Next, in the Object Window, expand the Characters category, then click on Quest, and filter for your prefix to find the quest you made. Double-click it to open it up.
- On the scripts tab, select SimSettlements:AddOnScript and click Properties.
- Double-click on SIMParent and select kgSIM_SIMSettlementParent from the drop down menu.
- Double-click the MyClutter section, it will be in blue and have a horizontal line next to it. This will expand the MyClutter properties.
- Double-click MyMartialFlags.
- Check in filter and enter your prefix.
- Select your flag list from the Pick Object drop down.
- Press OK to close the properties window.
- Press OK again to close the quest.
- Now click File->Save to save your plugin. Name it anything you like.
You’re done!
Your flag will now be selectable from the flag menu on the City Planner’s Desk!
To add additional flags, just repeat the Configuring Your Flag section and add your additional Dynamic Flag Records to your flag formlist you created. No need to do configure additional quests.
If this is your first Addon for Sim Settlements, know that there can be a short delay after starting up your game before it registers completely with Sim Settlements, so don’t be alarmed if your flag isn’t there in the first 10 seconds.