Toolkit Chapter 07 Releasing your Mod
All of my guides will highlight things that are specific to your experience level: Green for beginners, and Red for seasoned modders. So if you’re new, you aren’t meant to understand the red messages, and if you’re a vet - you can probably skip the green.
Preamble
While this tutorial is directed at new mod authors, if you are a vet, you should skip to the section titled Coming Up With Standards To Help the Player-base. There is a small template you can use with your description so that players can make sure they have the minimum version of Sim Settlements that your Add-On pack requires, as well as outlines which features of SIM Settlements it supports.
IMPORTANT: Never include any of the Sim Settlements scripts or other files with your mod, as long as the player has Sim Settlements installed, it will detect them. Doing so will make it impossible for players using your Add-On pack from ever receiving updates to those files. Since Sim Settlements is an ESM, every file you include will overwrite those in Sim Settlements.
The moment is finally here, you’ve spent hours dealing with kinggath’s crazy tutorial series, you’ve made some buildings, or VIP stories and are ready to share your work with the community!
First things first - consider the limitations of modding Fallout 4. If you’re unaware, due to the way mods are handled in code, there is a limit of 255 mods for any individual player. So releasing a single building plan in your mod, may not be appealing to some players.
You are more than welcome to release just a tiny bit of content at a time! Though I want to give you some ideas to help encourage users to make use of your add-on pack:
You might want to wait until you have a few more buildings/stories complete. Or you could clearly explain in your description that you plan on adding more content in the future, maybe mention that you’re looking for feedback before you put in more time on the project.
Or consider teaming up with other budding mod authors you meet in the Discord channel to combine your content together to make a super add-on pack (if you decide to go this route, myself and other experienced authors can help you merge your esp files together!).
And of course, I will gladly promote your add-on pack on the description page of Sim Settlements! Just send me a link after you’ve released it with a screenshot you’d like me to use in promoting it!
With all that said, let’s get started!
Coming Up With Standards To Help the Player-base
Based on the number of requests I’ve received for the Builder’s Toolkit, I think there’s a chance we see a lot of different Add-on packs - which is awesome! I dream of being able to play this mod one day and never seeing the same building twice after I’ve built up all of my settlements. Obviously, I can’t do that alone - so I’m incredibly excited that so many of you guys are interested in adding your own flare!
Sim Settlements is going to continue to gain features over the foreseeable future. Some of these will add major new possibilities to what you as an Add-On builder can do to the system. Since these upgrades will change some of the scripts involved, you’re going to have to require that not only does the player update your mod, but also to the appropriate version of Sim Settlements.
On top of version concerns, you also have a lot of options over how complete your buildings are. You can absolutely release a building pack where all you’ve done is the base models and haven’t added construction stages as they will still look awesome inside of player settlements - but you should warn the users about what features you’re not supporting.
To help make it easy for Sim Settlement users to know what to expect from your Add-On pack, I’ve included a little template you can add somewhere in your description to help players know what they are getting!
So if you decided to skip the navigation step, I won’t start receiving as many bug reports that navigation stopped working because the player will have clearly seen the template in your description.
If you don’t like the design of the template, feel free to create your own - I just wanted to provide a starting point.
The template can be found inside of the Builder’s Toolkit in a folder called “Add-on Pack Description Template”.
The Nexus: Where it All Began
Sim Settlements, and my Fallout 4 modding love, wouldn’t exist if it weren’t for nexusmods.com. The site has created such a great community, and wonderful tools for mod authors to manage their mods. So we’re going to start there.
In fact, I’d recommend you always release on nexusmods.com first, to make sure you fix all the bugs (bugs for add-on packs will probably be little things like placement issues or navigation problems). The Bethesda.net user base is far larger, and will overwhelm you with bug reports if you aren’t prepared.
I will probably make another tutorial for uploading to Bethesda.net in the future, but the process is very simple, so existing Youtube tutorials may be enough.
If for some reason you don’t have a nexusmods.com account, go set one up!
First thing we need to do is create you a mod page! Don’t worry, it won’t be public until you decide to publish it.
- Log into https://www.nexusmods.com/fallout4/, mouseover Files and choose Add a file

- This will take you to a Wizard for adding new files. Start by filling out the first page. If you’re not sure about an entry, it’s probably safe to leave it as the default. You can edit this stuff in the future with the Edit Attributes button on your mod page.
- When you get to the Long Description, if you switch to BBCode (link in the upper-right corner) and then paste the contents of the “Optional Header For Your Nexus Description.txt” in the Builder’s Toolkit, when you click BBCode again, you will have a logo and a list of building types and features that you can fill in the answers for!
 Obviously you can add whatever you like after this, or use something entirely different - but this should help you finish quickly while also informing the players what you’re proving them!
- When you get to the Long Description, if you switch to BBCode (link in the upper-right corner) and then paste the contents of the “Optional Header For Your Nexus Description.txt” in the Builder’s Toolkit, when you click BBCode again, you will have a logo and a list of building types and features that you can fill in the answers for!
- Continue filling out whatever screens you’d like in the wizard, such as adding images or videos to sample some of the new stuff you’re adding (don’t share too much or you’ll take away I’ll the excitement of upgrades!).
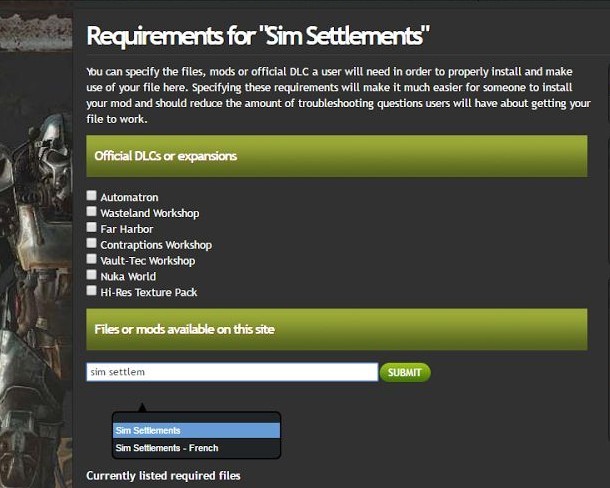
- When you get to the requirements screen, check in any DLC that you used content from, and be sure to find Sim Settlements under Files or Mods Available on this Site (see image below)
- When you get to the requirements screen, check in any DLC that you used content from, and be sure to find Sim Settlements under Files or Mods Available on this Site (see image below)
- When you get to the files section, skip it. We’ll do that last.
- When you’ve finished everything but the files, click on the View File Page So Far to preview your work.


Alright, almost there. We just need to upload your files. First there are a few steps to do to package them for players to download so that they work with Nexus Mod Manager nicely.
- Let’s package up your files.
- We’re going to use a file included with the Creation Kit, instead of the Creation Kit itself. The Creation Kit is notorious for including files it shouldn’t that could break other mods - the most likely one it would break in this case would be Sim Settlements (wouldn’t that be embarassing…)
- Go to your Fallout 4/Tools directory, find the Archive2 directory and open it up, then open the program Archive2.exe. (this might be another one worth pinning to your taskbar or adding a shortcut to somewhere else, as you’ll use it every time you want to make an update to your mod!)

- Click on the Archive menu and choose Add Folder, now navigate to the folder you’ve been saving your models to. It should be under Fallout 4/Data/Meshes. Click your folder (but don’t open it) and press the Select Folder button. All of your models should be added to the screen!

If you added any other custom files to your mod such as sounds, or script fragments you will add them here as well. Do NOT add textures to this archive, textures are stored separately. Since custom textures are not discuss in this tutorial series, I’m not going to go over creating those archives, feel free to ask for an assist if you decided to add some! - Finally press File->Save As and navigate to the Fallout 4/Data folder. Your archive should be named:
Yourespname - Main
Where yourespname is the file name of your mod without the .esp, and there should be a single space before and after the dash. - In the future, when you want to make updates to your mod, or changes to your models, before uploading the changes, you’ll want to come back and repeat these steps, except that you can first open your existing archive with Archive2. You can then just add your entire meshes folder again, and the program is smart enough to just update the ones you changed.
- Next we’re going to create the package that you’ll upload to nexusmods.com
- Go to your Fallout 4/Data directory, and grab a copy of your esp and ba2 files.
- Set yourself up a folder on your hard drive to work in, I’ll refer to it as your Packaging Directory and paste your two mod files inside of that folder.
- Next, create a folder called “fomod”.
- Inside the Sim Settlements Builder’s Toolkit is a folder called “FOMOD Template”, inside is a file called info.xml, copy it your newly created fomod directory.
- Open your copy of info.xml with an editor such as Notepad++.

- Change “Your Mod Name” to whatever you want to call it (use Sim Settlements in the name to help people find it!) Examples, bigjohn’s Sim Settlements Building Pack or mustangsally’s Sim Settlements Story Pack.
- Change “yournexususername” to your nexusmods.com username
- The version can remain 1.0 for now, but if you decide to update your mod, you should come back here and change this number so that the user can see in Nexus Mod Manager that they have the version that matches the website.
- In the Website section, replace “YOUR MOD NUMBER HERE” with the number assigned to your mod, which you can see in your browser url of the mod page we created in the previous steps, it will look like:
http://www.nexusmods.com/fallout4/mods/XXXXX
Where the Xs are your mod number. - In the description, replace the Xs with the version of Sim Settlements you had installed when you last worked on your mod file. This is the earliest version of features you used. That way if I release new features you take advantage of, you can be sure you at least warned your users they need to update Sim Settlements as well as your mod!
- After the Sim Settlements link you can add whatever you want to the description. I tend to just put a very simple explanation of what my mod is, and let the main nexus mod page do the talking.
- Save the xml file.
- Go to your Packaging Directory, select the fomod folder, your mod file, and your archive file, right-click on one and find the 7zip menu and choose Add to archive (continued on next page)

- Enter a name for your archive at the top and Press OK.

- Now go to your mod page, and click Files on the right hand side, this will take you to the File Management section.

- Click the “upload form” button, to be taken to the file details page:

- Enter what you’d like people to call your mod (including Sim Settlements AddOn Pack as part of the name will probably be helpful so people know what it is right away!) Examples: Papajulio’s Addon Pack for Sim Settlements, or Raider Home AddOn Pack for Sim Settlements.
- Enter something like Main File as the small description (This is a small description of the file itself - you’ll see a lot of mod authors will use this to denote optional files).
- Click Select a file to upload… and upload the archive you created.
- Type in the exact same version number you have in your info.xml file. (this is how players will confirm they are on your latest version).
- Check in the “This is the latest version…” and “Set the new file as the main NMM file”.
- When the file finishes uploading a Submit button will appear at the bottom of the screen. Click this to save your work.
- Click View File to go to your mod’s page.
- And finally the moment you’ve been waiting for…. Click Publish.


You are now officially a mod author! Welcome to the club!
Don’t forget to send me a link so I can promote your Addon Pack!