Toolkit Chapter 05 Randomized Clutter
This tutorial assumes you know basic navigation and keyboard shortcuts to navigate the Creation Kit. If not, please go back and check out the Creation Kit 101 primer.
All of my guides will highlight things that are specific to your experience level: Green for beginners, and Red for seasoned modders. So if you’re new, you aren’t meant to understand the red messages, and if you’re a vet - you can probably skip the green.
Contents
Preamble
You should now have a building that constructs itself, has upgrade levels, lights, decorations, and even furniture markers such as beds. (If you built a house and forgot to give it a bed, you should probably go fix that!)
Now I’ll show you how to take use of the existing Random Clutter and how to create your own sets as well!
How Random Clutter Works
Random Clutter is very simple system, with a powerful effect. Using it will really bring your buildings to life as the contents will not only randomly be selected when the building is created, but will also periodically while the game is played.
The system is based on FormLists (remember that thing we created to hold your Building Plan in the first tutorial so it could be automatically added to Sim Settlements?). When the StageSpawnedItem system runs into a FormList it picks an object at random from that list and creates it. Yes, that means you can use it to randomize anything, in fact the building models system also has this feature - if that gets you excited, it should! You can do some very powerful things with this knowledge. It will be covered more in the Advanced Possibilities section.
Using Random Clutter
As of the time of this writing you have a few options: Use existing clutter lists from Sim Settlements (which will be listed at the end of this document), or create your own from scratch.
A third option will be added in the future which is to inject some of your clutter into the existing lists so that everyone can enjoy them on all building models, not just the ones you create! If you would like to do this immediately, please contact me and I can create you a special script to do so before I add the feature officially.
Let’s start by adding some existing random clutter to your building.
- If you followed my advice about saving your work to Layers, unhide the layer of one of your buildings so we can just work with that. If you haven’t finished decorating or already cleared everything out of this cell, then go the Object Window and bring the SCOL of the building model you want to work with into the cell and set it in the center (0,0,0).
- Now, go to the Object Window, go to WorldObjects->Statics and filter for “kgsim_randomclutter”. This will bring up all of the models that are used in the Random Clutter system. The names describe what kind of stuff they are and the size of surface they cover. You’ll learn to recognize those surface sizes over time.
- If you want to view all of the random clutter at once, it is currently laid out underneath one of the house models on the cement in the far back of kgSIMTestCell.
- Select a type of clutter that appeals to you and position it somewhere on your model, such as on a dresser or dinner table so that it looks nice. Don’t worry the randomization magic will happen in a second. For now, we’re just interested in making sure we have good positioning data. Be sure to zoom in close to your surface, and lower the items so that they are sitting nicely against the surface.
- Next follow the steps to add an item to your StageSpawnedItems with one change:
- When you get to the FormToSpawn step, instead of selecting the Static you used for positioning, choose FormList as the Form Type.
- Filter for “kgsim_randomclutter”, then select the one whose name is in the clutter you used for positioning.
- Repeat on every surface you’d like things to be randomly selected!
Creating Your Own Random Clutter
For the most part random clutter can be anything that is in a FormList. To make the most of it though, it’s best to use a Helper object and make sure everything fits within that helper surface. That way when you’re doing your positioning for the StageSpawnedItems setup, you can be sure that all of the clutter in that list will look good on that surface (I’m sure you’ll find some in Sim Settlements where I fail to heed my own advice).
I’ve created a series of helper objects that cover a wide array of the surface sizes throughout the game. So let’s walk through creating a clutter object for use in the Random Clutter system.
- Before we start, be sure to take anything you were working on the kgSIMBuildingStage cell and move it to a layer so you can hide it (if it isn’t already on it’s own layer). Then hide it so all we have left is our concrete pad.
- In the Object Window, go to WorldObjects->Static, and filter for “kgsim_helper*marker” (the * is a wildcard that lets the filter replace it with any amount of characters in place of it).
- Choose one of them and drag it into the Building Stage cell. Then set it’s location to 0,0,0. (If the helper marker fell into the concrete blocks, hold the Z key on your keyboard, then left-click and hold while dragging upward to pull it out. If that isn’t clear, watch the videos referenced in the Creation Kit 101 guide).
- If it doesn’t appear to show up, you may have Markers turned off, press M on your keyboard while the render window is active to display them again.
- Do NOT rotate it. It’s very important that markers you use as helpers are not rotated, this helper is going to act just like our AlignmentHelper for creating building models.
- Now using Statics (WorldObjects->Static), place a few items on the helper. Be sure that their bottoms are flush with the bottom of the helper.
- Next, use the method you’ve used throughout the tutorials to create an SCOL/Nif/Static.
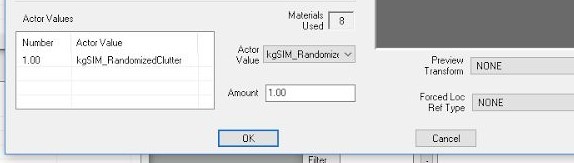
- Here we’re going to do something new. Once you create the static model, open it up, and in the lower left hand corner of the window you should see a section called Actor Values. You’re going to right-click inside that area and select New. Filter for “kgsim_random”, and double click “kgSIM_RandomizedClutter”.
- Another tiny box will appear, enter 1 as the value. (If you pressed OK too quickly and it entered 100, you can select the Actor Value in that box and edit the value to the right of it.)
- Another tiny box will appear, enter 1 as the value. (If you pressed OK too quickly and it entered 100, you can select the Actor Value in that box and edit the value to the right of it.)
- Now since we want to test the randomness out, go ahead and repeat the process, using the same size helper and create one or two more.
- Once you have a few models together for randomizing. Create a new FormList (Miscellaneous->FormList in the Object Window, then right-click on the right-hand side and choose new), name the ID something you can recall - I tend to include RandomClutter in the ID. The actual Name field can be anything to further describe it.
- While the FormList is still open, filter out your newly created Clutter statics and drag them into the FormList. Then press OK to save the list.
- IMPORTANT! Do not mix and match clutter on multiple lists, if you’d like to use piece of clutter from another list (such as one of the ones that comes with Sim Settlements), duplicate and rename it. Otherwise, the random clutter system could end up switching the list it pulls from during the game!
- Save your Plugin.
Few more steps to go (giving your eyes a break on that giant list of numbered steps, phew!) - Unhide a building model you’d like to add this Clutter set to, and drag your clutter item wherever you want it. Now that you’ve created the SCOL, you’re free to rotate it - it’s only important to keep the helper object from being rotated by itself (that seems weird yes, but trust me - the Creation Kit thinks it makes a lot of sense ;) ).
- Now add that Clutter FormList to your StageSpawnedItems the same way that was described in the previous section.

Continued Randomization
As of right now, your clutter will be correctly randomized when it’s first spawned, but if you would like all of your clutter objects to be randomized periodically during the game. There is one more process to do, this particular step only need to be done once and from then on, you will just add your new Clutter lists to one of these controller lists you’re about to create. Stay with me, it’s simpler than it sounds!
- In the Object Window, go back to Miscellaneous->FormLists. Create two new FormLists, one with AlwaysRandom in the name, and the other with SometimesRandom in the name (do I still need to remind you about the prefixing?). These will act as your Control lists, telling Sim Settlements how to process your clutter.
- The first list will make any Clutter FormLists you add to it (FormLists inside of FormLists? Madness!) randomize every time the player returns from being away for a while. The second list, will make the clutter change just occasionally. So things like food on the table are great on the first list, while store goods might be better on the second list. So choose one of those two lists and add your Random Clutter list to it! In the future, when you create a new Random Clutter list, you only need to follow this step - just pick one of your two control lists, and drop your list into it.
- Now the final piece, telling Sim Settlements about your two control lists:
Open the Quest you created, hopefully you can remember the name (search for that prefix!), but if not, I will show you a trick.
In the Object Window, expand the Character category, and click on Quest. Next, click on the words Form ID near the top and to the right inside the Object Window. This will sort the objects in the order they are created, yours should be the first one! (If not, click it again, and...ta-da! If still no, well then you did something wrong… might need to mozy on back to the first tutorial) - Once your quest is open, go to the Scripts tab, select SimSettlements:AddOnScript and click Properties.
- Double-click MyRandomizedClutterLists and point it to your AlwaysRandom control list.
- Then Double-click MyOccasionallyRandomizedClutterLists and point it to your SometimesRandom control list.
- Click OK, to exit the properties screen, then OK again to close the Quest screen.
- Save your Plugin.
You’re Done!
You can pop into the game, test your building plan, look at the clutter, demo it, then test your plan again, and each time it should receive a different clutter static from your list (well it’s random so it could grab the same one again - but just keep repeating that demolition and you’ll get there!).