Toolkit Extra - Animated Objects
All of my guides will highlight things that are specific to your experience level: Green for beginners, and Red for seasoned modders. So if you’re new, you aren’t meant to understand the red messages, and if you’re a vet - you can probably skip the green.
This tutorial will go over several methods for animating objects for use with Sim Settlements. This is an advanced tutorial and assumes you’ve gone through all of the tutorials for creating a Sim Settlements building.
Contents
Preamble
These tutorials are no substitute for 3d Studio Max experience. While you’ll be able to add some very good looking animations with these methods, they are never going to be exactly as you envision them because these methods have certain limitations.
Two of these methods are re-using existing animations and replacing the assets that are being animated, you have some amount of control over the details, but it’s not perfect. The third method can pull off some very convincing production lines, but is limited by what the game engine can handle.
This preamble isn’t meant to scare you away from using it, but to temper your expectations, so you understand you’ll probably have to make some sacrifices. You’ll still have some of the coolest settlement set pieces around, they just might be slightly different than you dreamed up.
Programs Needed
- Nifskope 2.0.6 Alpha or higher
- Creation Kit
- Industrial Revolution Expansion (includes assets needed for the tutorial)
Creating Basic Machines
This method involves taking pre-animated nifs, and replacing the model portion so that your model is animated in the same pattern as the animated object. This section will show you various things you can do with existing animated nifs to create whole new ones with the base animation of the original file at the core. While there are tutorial style examples, most of this section is just a tour of animated nifs to help demystify them a bit, so you can edit them more confidently.
Included with Sim Settlements - Industrial Revolution, are a handful of nif files that are meant to be copied, dissected, and repurposed for creating machines using simple looped movements. You’ll want to extract SimSettlements_XPAC_IndustrialRevolution - Main.ba2 to a separate directory (do NOT extract this to your Fallout 4/Data folder or updates to the expansion pack won’t affect your game).
Navigate to the extracted files and find the folder Meshes\SS_IndRev\AnimatedObjects.
Inside this folder are some nif files and a folder called SoundSynced. The nif files use very basic animations and will loop indefinitely when used. The nif files inside of the SoundSynced folder have two slightly different characteristics:
- They won’t start playing until you activate them - this is because they are configured as Door objects.
- They have the capability of playing sound files automatically during the animation.
Why a door? Doors ended up being the simplest type to create that would support sychronized sounds and didn’t require building special controller files (hkx files) or subgraph records. HKX and Subgraph records are not covered in this tutorial, those are extremely advanced topics you won’t need unless you’re getting into 3d Studio Max animation.
We’re going to start with one of the simple nifs to demonstrate some of the things you can pull off. I’ll then show you how to make use of the extra features added via the SoundSynced models. You are by no means limited to using these models, if you find other animated objects in the game that loop automatically, you’ll be able to repeat these techniques with those.
- Make a copy of AnimRotateSlow.nif and open your copy in Nifskope. First thing to note, is the animation control bar above the preview window in the top right:

This will let you play the animation in Nifskope to preview it as you tweak it, the first button plays/pauses the animation, the second button toggles whether to continuously loop it. - Expand 0 NiNode, then expand 2 NiNode, where you’ll find 3 things: the animation controller (NiTranformController), the collision (bhkNPCollisionObject), and the model (BSTrishape).
- NiTransformController: This is what controls the animation, it doesn’t actually care what it’s animating - all it does is tells its target to change its rotation value by a certain amount every 3.366667 seconds.
- How do I know that? Click on 3 NiTransformController then look at the Block Details section.
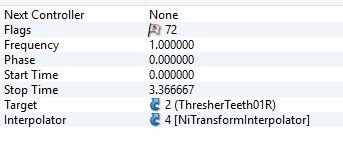
This section tells you that the animation lasts 3.3666667 seconds and that it’s going to apply it to the 2 ThresherTeeth01R Node (only the 2 is important, this is the ID of the Node and we’re working on 2 NiNode - these are the same node, they are just displayed differently in each section).
You might be tempted to change the Stop Time here to slow or speed up the animation, while that is part of it - you also need to change the animation keys. For some objects like this (which only have 5 keys), that’s absolutely possible, but for many other items you find, there may be dozens of keys, and manually editing them each becomes impractical (this is one of those limitations I warned you about).
Instead, the easier way to change the speed, is by editing the Frequency. If you change the frequency to a new whole number, you can effectively multiply the speed by that amount. Try it and use the animation controls to see the difference.
What you can’t do with this technique, is slow it down - let’s say you set the Frequency to 0.5, you’re telling the animation to only run ½ times, which will look very strange when looped as it will snap back into the starting position since a full animation isn’t allowed to run.
- How do I know that? Click on 3 NiTransformController then look at the Block Details section.
- Don’t let this next part intimidate you, it’s extremely advanced - if you start to glaze over, just skip it - I assure you the next section is easier!
Expand NiTransformController, then expand NiTransformInterpolator, then click on NiTransformData and look to the Block Details section of Nifskope.- This is where the individual animation keys exist. You can fine-tune control the animation by changing these values. All an animation is, is a series of frames representing where the object should be (Translations), which direction it should face (XYZ Rotations), and how large it is (Scales) - all of these are numbers that can be tweaked.
- Expand XYZ Rotations: there are three more XYZ Rotation entries, the first is the X rotation keyframes, the second is the Y rotation keyframes, and the third is the Z rotation keyframes.
- Expand the first XYZ rotation sub-entry, then expand Keys, here you’ll find all of the keyframes for the X rotation also labeled Keys.
- Expand the first key. There are 4 entries:
- Time - the time during the animation this starts.
- Value - how far to rotate on the X-axis in radians (you can find a degree to radian calculator on google if you aren’t comfortable with radians).
- Forward - the rate at which the animation is eased into.
- Backward - the rate at which the animation is eased out of.
- You can change any of the values in those key sections to completely change the existing animations, but if you were to expand the Translations section, you’d find no keys. Technically you could manually create them here, but it will quickly become overwhelming work and is another limitation of this method.
- NiTransformController: This is what controls the animation, it doesn’t actually care what it’s animating - all it does is tells its target to change its rotation value by a certain amount every 3.366667 seconds.

Since you’ve already extracted the Industrial Revolution models, let’s use one of those to try this.
- Navigate to the Meshes\SS_IndRev\Props directory and open MinedOre.nif in a new NifSkope window (it might be helpful to configure Windows to use Nifskope as the default program for opening .nif files, as you’ll be opening and closing lots of them while doing these projects)
- Expand 0 NiNode, then select 2 NiNode', now hit Ctrl+C on your keyboard to copy this node branch to your clipboard.
- Go back to the other file you have opened, click on 2 NiNode and hit Ctrl+V on your keyboard, this will paste the MinedOre node into this file. If you press play with the animation controls, you’ll instantly see this works and start rotating.
- Next we need to clean this file up to avoid it crashing the CK/game. We need to do the following things - fix the texture, remove the other model we’re replacing, point to the correct collision, and remove the extra node record.
- Fix the texture
- Go back to MinedOre.nif, expand 2 NiNode, expand 5 BSTrishape, click on 6 BSLightingShaderProperty.
- In the Block Details section, click on the Txt icon next to the name field, this will bring up a text input box with the material file path, copy this path to your clipboard. Press Cancel to close this input box.
- Back in your animated nif, expand 11 NiNode, expand 14 BSTrishape, click on 15 BSLightingShaderProperty.
- In the Block Details section, click on the Txt icon next to the name field, and paste the material path into the input box and press OK, your object should now have the correct texture.
- Remove the model we’re replacing
- Select 8 BSTrishape and press Ctrl + Delete on your keyboard. When you delete a node, Nifskope will reorganize the IDs so that there are no gaps in the numbers.F
- That’s it - this was the easy part.
- Point to the correct collision
- Under 8 NiNode, click on 9 bhkNPCollisionObject.
- In the Block Details section, double-click 8 (ThresherTeeth01R) and replace 8 with the number 2 and press Enter. We’re basically telling this collision that it should be the collision for the rotating node we’re working with.
- Click on 2 NiNode in the Block List, then in the Block Details section double-click 6 [bhkNPCollisionObject] and replace the 6 with 9 and press Enter (9 being the ID of our new collision object).
- The id 6 collision will be moved to the bottom of the Block List, select it and press Ctrl+Delete on your keyboard to remove it.
- Click on what should now be 6 NiNode.
- We don’t want two nodes using the same collision object or we’ll have a broken nif, so we need to disassociate the collision from this node. In the Block Details section double-click 7 [bhkNPCollisionObject] and erase the number 7 and press Enter.
- Remove the extra node record
- The Node we originally pasted from MinedOre.nif isn’t necessary- and a basic rule of thumb to avoid broken nifs, is to only keep as many Nodes as you absolutely need. When doing swaps like we’re doing, the easiest way to ensure this, is to confirm our nif has the same number and types of nodes as the original version had (you can always open the original up and compare).
Before we can remove this extra node, we need to get the BSTrishape out of it. The BSTrishape represents our actual model, the node itself is basically an organizational tool (like a folder) and all objects that are a part of the node are considered it’s children.
To get the BSTrishape out of this Node:- Click on 6 NiNode, then in the Block Details section, expand Children.
- Double-click 9 (ThresherTeeth01R:0), delete the 9, and press Enter. The BSTrishape should now be at the bottom of the Nodes list.
- Now that the BSTrishape is free from that node, we can safely delete that extra node without destroying the model. Select 6 NiNode and press Ctrl+Delete.
- If you were to push Play again, you’d see that nothing is rotating. We need to put the BSTrishape back into the rotating NiNode, to do this, we do the opposite of what we just did before and add the BSTrishape as a child of the rotating node.
- Click 2 NiNode.
- In the Block Details section, expand Children.
- Double-click the first None entry and type 8 (which is the ID of the BSTrishape) and press Enter.
- If you push Play again, your rock should now be rotating.
- The Node we originally pasted from MinedOre.nif isn’t necessary- and a basic rule of thumb to avoid broken nifs, is to only keep as many Nodes as you absolutely need. When doing swaps like we’re doing, the easiest way to ensure this, is to confirm our nif has the same number and types of nodes as the original version had (you can always open the original up and compare).
- Save your file.
Your nodes should now look like the image below (you may have to collapse some of the nodes you have expanded to get it to match the screenshot exactly)
- Fix the texture
- You can now use this model as a static object and it will automatically rotate in place. Best practice will be to include Anim or something similar in the name to avoid accidentally using it in an SCOL.

Next let’s open one of the SoundSynced models to go over the differences in the nif structure. We’re going to choose a fairly complex one so that you can see where all of the different pieces are and transfer this knowledge over when editing even the most complex animated nifs.
We’re not actually going to replace anything here, I’m just going to explain the differences.
- Open Meshes\SS_IndRev\AnimatedObjects\SoundSynced\Pendulum90.nif
- Expand 0 NiNode.
- The first difference of note, is the 2 NiControllerManager. This is used to control more complex animated objects and essentially contains and manages all of the individual controllers (such as the NiTransformController we worked with in the other model).
- Click on 2 NiControllerManager, then look at the Block Details section.
- NextController is used to point at the first individual controller this manager handles.
- Just like our other model, the Target tells us what object is being animated. In the case of a NiControllerManager, it will almost always point at the 0 NiNode (which is essentially the entire nif).
- Num Controller Sequences is similar to the Num Children section of a node, this tells you how many different animation sequences are handled. A sequence is essentially a complete animation, the NiControllerManager allows a nif file to have multiple animations, instead of just the single set of keyframes like you saw in our first example.
- Expanding Controller Sequences will reveal the individual sequences.
- Object Pallete is a special node that basically tells the NiControllerManager which nodes will be involved in the animation.
- Expand 2 NiControllerManager, here you’ll notice all of the different pieces we found in the Block Details section.
- Notice that in this particular nif, the animation toolbar at the top is different.

The first two icons are the same, but there is a third icon, as well as a new drop down menu.
The new icon tells Nifskope to loop through all of the different sequences, and the drop down menu allows you to select the sequence to play.
Take a look at the NiControllerSequences, the names next to them in the Block List section match the entries in this dropdown list. - For these particular models, since we’re using the Door type, they only have two sequences “Open” and “Close”, other models you work with may have many more sequences than this.
- When using these models, you’ll only be using the “Open” sequence. These models are designed to loop the Open sequence forever, so once you trigger the animation, it will never stop - which means the other sequences on this become irrelevant. This is not the norm, it’s essentially a trick we used to create constant animated objects that could be synchronized with a sound file.
- Expand 4 NiControllerSequence.
- The NiTransformInterpolator works exactly like what was described in the red scary section of the first half of this section.
- To synchronize sound files, you’re going to make use of the NiTextKeyExtraData section.
- Click on 7 NiTextKeyExtraData.
- In the Block Details section, expand Text Keys, then expand each of the sub entry Text Keys.
- These are essentially keyframes that tell the game engine something at a particular moment during the animation.
- The first entry “start” tells the game engine the animation started.
- The second entry “Sound: UIWorkshopModeItemPickUpMetal3Large” is the format used to cause a sound file to play. “UIWorkshopModeItemPickUpMetal3Large” is the ID of the SoundDescriptor entry in the Creation Kit. So you can make it play absolutely any sound you like. Note that you can create additional entries and play more sounds at additional time stamps if you like by increasing the Num Text Keys field and adding more entries the same way you’ve added more Children to other nodes.
- The last entry “end” tells the game engine the animation completed.
- Click on 3 NiMultiTargetTransformController, then look to the Block Details section.
- Just like the NiControllerManager, the Target field points to the top level node, this won’t always be the case, but usually is. The target object in these complex animated nodes usually isn’t being animated, but instead holds all of the objects that are being animated.
- Expand Extra Targets - these are the nodes that will actually be animated (you can ignore the blank entries, they were most likely placeholders that ended up not being used on export from 3ds Max). Notice the one entry in this particular model is node 13. This is the node you’ll edit if you want to swap out the model.
- Expand 13 NiNode.
- This node has multiple tri-shapes. This is absolutely allowed. You can add more, delete one of the existing, or just replace one of the trishapes.
- If you decide to add additional BSTrishape or node objects under 13 NiNode, it’s very important that you also update the NiDefaultAVObjectPallete object or you’ll end up with a game crashing nif.
- Click on 12 NiDefaultAVObjectPallete.
- You can then increase the Num Objs field and fill in your new nodes/trishapes, just like you would add Children to another node.
- Expand the Objs and then all of the sub-entry Objs. Notice how not only is the 13 AnimRope node here, but also both of it’s BSTrishape objects (16 AnimWeight and 19 AnimRope:0).It’s very important that if you add a new node, you include it AND it’s children trishapes in the object pallete.
The most difficult part of editing animated nifs, is keeping track of all of the different objects - especially since they are often displayed in different ways. The nif format was meant to be generated and read by computers, not edited by hand like this. That means that it’s a very logical format, but can also be cumbersome to edit.
The key to getting past this, is leaning on those ID numbers. Once you start getting used to looking for those ID numbers, you’ll see that often the same ID is repeated over and over - and they aren’t actually different objects, just references all pointing to the exact same object.
Start small with your tweaks, test often in the Creation Kit to check for corruption, and make frequent backups before you make additional changes after you’ve confirmed a previous change worked in the Creation Kit.
Fortunately, you don’t have to be afraid of breaking nifs and losing work because Nifskope is very forgiving. You’ll just save yourself a lot of frustration if you can roll back to when the file was working as a lot of this ends up being trial and error.
A great way to test models in the Creation Kit is to open the Creation Kit and don’t load any esp or esm files at all. Then go to World Objects -> Statics, and bring up a New static form and select your model from here. If there’s a problem with the model, it will crash even without you loading your esp files.
Creating Animated Textures
This method simulates movement by animating the texture of an object, it’s very useful when the moving just the surface of an object is enough - such as conveyor belts or water. This process is very simple, and similar to the first part of the previous section.
Go to the directory where you extracted the Industrial Revolution assets and make copies of Meshes\SS_IndRev\Props\ConveyorStr01A_anim.nif,
Meshes\SS_IndRev\IndustrialSizeA\Water\FiltrationPlant01\Water.nif, and Meshes\SS_IndRev\Props\MinedOre.nif.
Each of these has a different type of controller on it. The first is for the LightShader type, which represent most textures in the game, and the second is for the EffectShader type which represent special effects that usually don’t have a direct texture. You’ll essentially be able to able to use these two models for all of your looping animated texture needs.
Let’s go over them to see how they work and how you can change them.
- Open your copy of the Conveyor nif.
- Expand 0 NiNode, expand 8 BSTrishape, click on 9 BSLightingShaderProperty.
- In the Block Details section, you’ll see that this shader has a Controller. These controllers work nearly identically to the transform controllers you worked with in the previous section. If you were to open the Water nif, you’d find the same thing under the BSEffectShaderProperty, except it would be called a BSEffectShaderPropertyFloatController. The two controllers are functionally identical, but the game engine demands the controller type match the shader type.
- Expand 9 BSLightingShaderProperty and click on 10 BSLightingShaderProperyFloatController.
- Look to the Block Details section, the only difference you really need to be concerned with between these controllers and the transform controllers is the Type of Controlled Variable field.
If you double click it and then look all the way to the right, you should see a drop-down arrow for this field (you might have to use the scroll bar at the bottom to find this).
This determines which part of the shader will be animated. For movement, you’ll use the U Offset or V Offset which determines whether the texture moves left to right or up and down. You can also use any of the other options to animate those things, you’ll have to experiment to see what they each do.
- Look to the Block Details section, the only difference you really need to be concerned with between these controllers and the transform controllers is the Type of Controlled Variable field.
- In a new nifskope window, open your copy of MinedOre.nif
- Back in the conveyor belt window: click on 9 BSLightingShaderProperty and press Ctrl+C on your keyboard. (You want the entire shader property, not just the controller)
- Return to the MinedOre window and click on the model in the preview window, which will expand down to and the BSTrishape in the Block List section, click on that BSTrishape node entry to ensure it is active. Now press Ctrl+V to paste the shader property you copied from the conveyor nif. It should be at the bottom of the Block List.
- Click on the MinedOre BSTrishape again and look to the Block Details section, expand BS Properties.
- Double-click 6 (materials\Landscape\Rocks\RockBoulders.BGSM) and type in 8, which is the ID given to the shader property we copied over, and press enter. The two shaders should have swapped positions.
- In this particular example, the copied shader should have automatically picked up the correct material file/texture. If doing this in the future, it does not, be sure to fix the material following the same steps you did in the previous section tutorial.
- We no longer need the extra shader property, so select the 6 BSLightingShaderProperty and press Ctrl+Delete to remove it.
- If you were to hit Play now in the animation controls, you’d see the texture on the mined ore begin animating. It will look very strange because this particular texture doesn’t match up to the animation, but it was just used as a simple example. In general you’ll want to use textures that cover the full usable space, unlike this boulder texture which has lots of gaps in it, causing the black and grey sections which aren’t colored in the texture file. The way animating the U and V offset works, is that the texture is literally moved in one direction while the UV Mapping stays in place - if you’re not familiar with what UV Mapping is, check on youtube to find some simple explanations.
- One common thing you’ll want to do with these, that can be a bit tricky, is to reverse the direction of the animation.
- Expand down through the BSLightingShaderProperty until you reach the NiFloatData node, then go to the Block Details section and expand all of those entries. Here there are two keys.
- In the first key, change the value from 0 to 1. Think of these like decimal percentages, so 1 = 100%. We’re telling it to start with the texture at the end of the animation.
- Also in the first key, change the Backward entry from 1 to -1. Since we’re reversing the direction, we also need to reverse the easing.
- In the second key, change the value from 1 to 0. So now in the first key we’re starting at the end of the animation and working back to the beginning - aka reverse!
- Finally, change the Forward entry of the second key from 1 to -1 (as before, we need to reverse the easing as well).
- Why does this particular animation go from 6.66667 to 11.9666667? This controller was plucked from a model that had multiple animations. If you’d like you can change the key times to 0 and 5.3 (11.96666667 - 6.6666667 = 5.3), and then select the BSLightingShaderPropertyFloatController and change it’s Start and Stop times to 0 and 5.3, respectively. It doesn’t actually matter, but it will make it easier for you in the future if you want to tweak the animation length.

For these kinds of simple looping animations, it’s very easy to manually edit the keyframes since there are only two of them, which means you can continuously copy and reuse the FloatControllers available in these two files for all of your animated texture needs. You could even add additional keyframes if you like, to make more complex animations.
Creating Production Loops
This method uses a script to move an object, or a continuous parade of objects along a path you create. This is especially useful for simulating assembly line productions without the need for the Contraptions DLC.
With patch 2.04 a new script called AnimatedObjectSpawner was added, this can be added to an object which is meant to be used as a StageItemSpawn to generate an object or objects that will follow a path you set up.
To start, let’s layout a path we want to follow.
- Open your add-on and bring up one of your building models that’s aligned at 0,0,0 in a cell, just like if you were about to lay out furniture and lights for configuring the StageItemSpawns.
- Start by laying out the object type you want to spawn in the position you’d like them to first appear, this is often best going to be inside of something to hide the spawning from view, but it doesn’t have to be if you don’t mind the object materializing in front of the player.
- This represents the coordinates you’ll use when placing your AnimatedObjectSpawner.
- Duplicate that object and move it a short ways, (if you have experience with animation, you’re essentially going to lay out the major keyframes for this object).
- Continue duplicating this along a path of your choosing. In general, you only need an extra copy where the direction or rotation changes, otherwise the script will handle all of the in between motion to get from point to point. Once you have a path laid out, we’ll create your spawner.
- In the Object Window, expand World Objects and click on Activators.
- Right-click in the right hand side and select New.
- Give the spawner a unique ID and set it’s model file. (I tend to use kgSIM_HelperTiny_Marker as it’s invisible. You can use any model you like, but remember that the objects to animate will spawn at the origin point of the model.)
- Press OK to save the form and then re-open it.
- Click Add under the scripts section and add SimSettlements:AnimatedObjectSpawner.
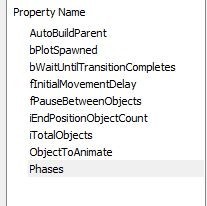
- Double-click AutoBuildParent and select the only option from the dropdown menu.
- I’ll now explain what the optional fields do, you can decide what to set them to.
- bWaitUntilTransitionCompletes: If checked, this won’t spawn another object until the original finishes its journey. This is especially useful if you want to simulate a single object continuously making a loop.
- fInitialMovementDelay: This will pause the items after spawning for this many seconds before they are moved on the path.
- fPauseBetweenObjects: This will place a pause for this many seconds before creating the next object. This has a hard minimum of 0.25 seconds. Be very careful with this setting, having it too low without limits in the next two fields could quickly overwhelm the engine.
- iEndPositionObjectCount: The number of spawned objects allowed to exist that have been through the animation. Once this number is reached, after the next object reaches the end of the animation, the oldest object will be removed. This allows a continuous stream of items to be dumped into a pile (assuming you are using havok enabled items), without getting out of control. This is hard capped at 100 items to avoid overloading the engine. If you don’t need any objects to stick around, for example if the path ends inside somewhere hidden, set this to 0, and each object will be removed after it completes the path.
- iTotalObjects: Once this many objects have been spawned, the spawner will shut down until the cell is unloaded and loaded again. At which point it will start creating objects again until it reaches that number.
- ObjectToAnimate can be pretty much anything, it can even be a FormList to allow a random entry from that list to be spawned each time. Here are some things to consider when deciding what to animate:
- If you use actual lootable objects, the player will be able to pick them all up, creating an unlimited resource - which is probably not good.
- Objects are released to gravity (via the Havok engine) at the end of the path, which means MoveableStatics make the best form type. You can take most existing items, such as food, chems, and weapons, and use their model file in a MoveableStatic record and it’s havok data will still work in the new form.
- If you use a static object, the item will stay frozen at the end of the path and will not be controlled by Havok.
- Phases are what control your keyframes. They work very similar to StageItemSpawn entries in that you’ll enter the coordinates and rotations of the items you laid to represent the path.
- Skip your first item, because that’s where the actual spawner will go, so double-click the second item to bring up its properties.
- Add a new phase and copy paste all of the position and rotation data from the item properties window.
- Next choose a speed, this is in units per second. For reference, a plot is 512 units wide.
- The fHavokPause is an optional setting. Entering a number of seconds here will temporarily release the item to gravity when it reaches the coordinates you entered. This is useful if you’d like to add a drop in the middle of the animation. This setting can result in some funky things happening that you’ll have to do trial and error to correct. Once an item is dropped to gravity, it’s origin may be in a different spot than you originally planned for, so that the next phase coordinates may end up being too low or too high. Once you test the cycle in game, you’ll get a feel for which direction the item will land each time and be able to roughly compensate by altering the fOffsetZ of the next phase. It’s imperfect, but you should be able to find something that works most of the time.
- The bDoNotRotate option will prevent the object from rotating back to 0/0/0 after a Havok pause. I tend to use this on every phase after introducing a havok pause. Alternatively, you can do the same adjustments described in step 13d, to alter the phase rotations based on what you see happen during tests in-game.
- Once your Phases are configured, press OK to save your spawner.
- Open your building plan, and add a new StageItemSpawn record, using the coordinates and rotation of the starting position object you placed.
- Test it in game by building or refreshing that plot!

This script method is great for both creating translation movement in the game world and spawning continuous objects to simulate a production line. Versus the other two methods which create looping movement of the object itself. It definitely takes some trial and error to pull off, but the effect is very cool and avoids reliance on things like the Contraptions DLC objects.
You’re done!
You’re now equipped with the knowledge to start tearing apart and assembling animated nifs and laying out scripted production lines (or other creative uses of that script).
As with all the tutorials, if you need help with any of this, just ask on the SimSettlements.com forums or the Discord server!