Toolkit Chapter 06 Settler Navigation
This tutorial assumes you know basic navigation and keyboard shortcuts to navigate the Creation Kit. If not, please go back and check out the Creation Kit 101 primer.
All of my guides will highlight things that are specific to your experience level: Green for beginners, and Red for seasoned modders. So if you’re new, you aren’t meant to understand the red messages, and if you’re a vet - you can probably skip the green.
Preamble
Alright, you’re on the home stretch to having a feature complete building! Compared to the time involved in the previous tutorials, this one will be a breeze.
We’re going to do two things, Navmesh your 3 building models (Navmeshing is a process to teach AI how to walk through a space), and add a special type of collision called Obstacle Navcutting. Obstacle Navcutting is not an official term, it’s what I call it because of the pieces involved. We’re making use of an old trick Bethesda used in Hearthfire to dynamically manipulate the Navmesh at runtime.
Obstacle Navcutting is something special you need to do to Sim Settlements buildings. If you are used to building workshop creatable buildings, or want to go on to doing so with the skills you’ve learned here, you won’t need to do this step.
When objects are spawned by code the way they are in Sim Settlements, their navmesh (the other part we’ll be doing to the building in the next section) is not immediately recognized by the game. The player has to first exit the game and come back in for it to work.
So we’re going to add some rudimentary boxes to show the NPC how to get around!
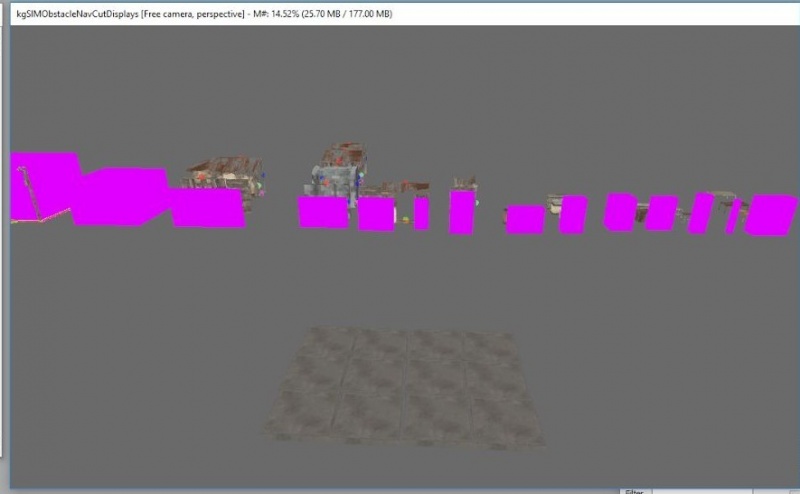
- Go to the Cell View, make sure World Space is set to Interiors and open the cell kgSIMObstacleNavCutDisplays.
- This is a cell with pre-created boxes (those bright-pink eye sores) laid out along with the approximate sized items they will work for.
- This is a cell with pre-created boxes (those bright-pink eye sores) laid out along with the approximate sized items they will work for.
- Now find the SCOL for your first building level, and float it somewhere above the cement pad (catch those falling models!).
- Next, fragment the collection with Alt+U.
- Your goal here is to add those pink boxes to your walls, and any large object that is between the doorway and any furniture the settler needs to get to activate such as a bed, or a shopkeeper marker.
- They don’t need to cover vertically, in fact they should be sunk below the floor by a about 20% of their height.
- Remember in the first tutorial, I suggested you bake your major pieces of furniture into the model? This is one of the reasons. It’s very easy to simply pick a box that matches the furniture approximately.
- Leave plenty of space. The doorway size you’ve seen in the game is about as narrow a gap as you should leave between any two of these boxes if you want the NPC to be able to walk between them.
- Overlapping corners is NOT necessary, if the space between two of these is less than half a doorway width, the NPCs generally won’t even attempt to walk between them.
- Don’t worry about furniture up against walls if it will not block a path to things the settler will not activate (Settlers will only activate objects of the Furniture type that you placed).
- If your building has two or more stories, do not worry about the upper floors, those will be handled by our NavMesh in the next section.
- Note: These boxes are markers, so they will not show up in the game!
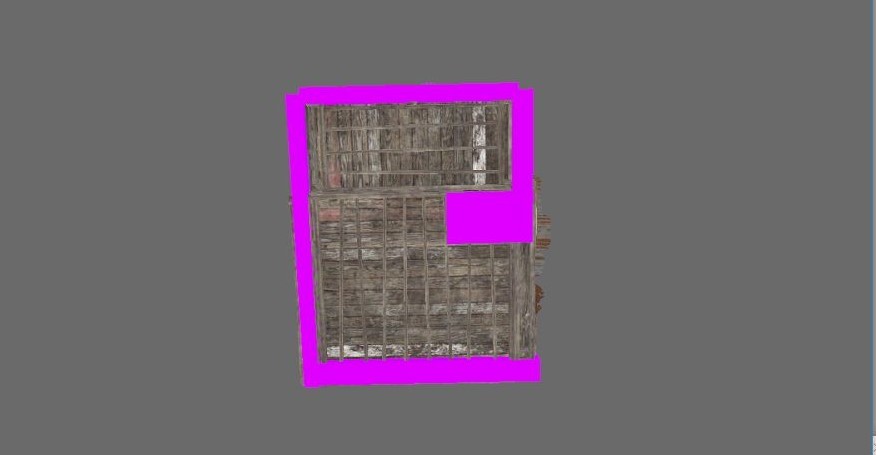 Obstacle navcut as viewed from underneath of the SecuriStop Armor Store. Your box layout should look similar from the bottom. Notice the large gap near the doorway, and the very small box used for the counter. Better to go too small, than too big.
- Once you’ve set up the boxes, you’re going to follow the normal steps to create the SCOL/Nif/Static - with a few differences:
- When naming your SCOL, add _Obstacle to the end of the name.
- When you’re in Nifskope, do NOT press Save right away like we normally do, first you’re going to do a few additional steps:
- Throughout this section I will refer to “Blocks” some people refer to them as “Nodes”, which is essentially any one of these entry lines inside of Nifskope - it’s a little more complex than that - but for our purposes, that will work!
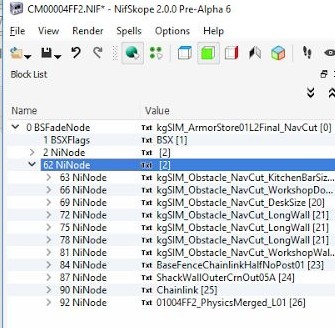
- Click the > next to 0 BSFadeNode to expand it.
- Look at the revealed Blocks and expand them one at a time until you find one with a bunch of things under it with kgSIM_Obstacle in the name.
- Click on the NiNode that has all of the kgSIM_Obstacles under it, count the number of entries that do NOT have kgSIM_Obstacle in them.
- Go down to Block Details, and change the Num Children field to be the number of Non-kgSIM_Obstacles (You can edit that number by double-clicking it.).
- Double-click the refresh icon, and expand the Children list below. You should notice now that things have changed in the list of Blocks above. The one you have selected now only has some of them left under it equal to the Num Children you just entered. The rest are now down at the bottom of the file. This is normal.
- In the Children section, you’re going to make sure the entries left are all pointing to the NiNodes that are not kgSIM_Obstacles, to do so, double-click on one of the Children entries (aim for the number) and type in the ID of one of the ones you need to point at that was moved to the bottom of the blocklist. See below for a image example:
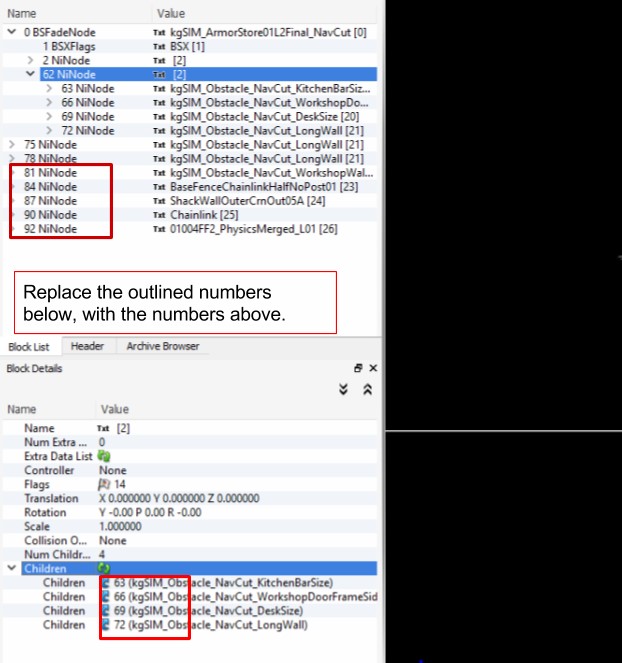
In this we would click on 63 at the bottom of the file, and type in 84, so that the BaseFenceChainLinkHalfNoPost01 is moved back here. We’d then replace the 66 in the bottom window with 87, and so on.
All that should be left at the bottom of your file, offset slightly to the left, are the kgSIM_Obstacles. - Click on 0 BSFadeNode in the Block List, then edit the Num Children entry in the Block Details. You’re going to take the number there and increase it by the number of kgSIM_Obstacle objects. So if the number is 2, and there were 6 obstacle objects, you’ll change that number to 8.
- Now, doubleclick the refresh symbol just below that number you edited and expand Children.
- For each of the None entries, enter the ID for one of the kgSIM_Obstacles.
See image below for an example of a what a correct node layout should look like once you’re finished with these steps.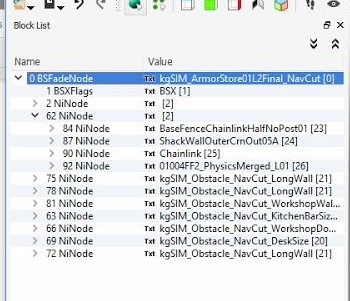 Your finished nif should look something like this. If you click on the down arrow next to 0 BSFadeNode, everything else should be hidden. If not, you did something wrong.
 - Now before you save this, you should make a backup of the nif file you already created for this model, before you added the Obstacle pieces. Once you’ve made a backup copy, save over the original file - which will automatically update your Static form in the Creation Kit.
- Last step. Open the Static form (not the SCOL) of the building model you just edited, and check in Obstacle. This tells the game to look for the pink boxes when deciding how the NPCs should move around.
- Head into the game and give it a test! You should be able to command an NPC to walk into your building without it running into a ton of stuff! If it doesn’t appear to work at all (they run directly into the side of the building), you may have missed a step - or you may have left large gaps where you shouldn’t have.
- If you continue to struggle to get this to work, you can test changes to the model before you do all of the Node manipulation, though sometimes it will cause the game to crash to desktop - so be aware!


Some experienced modders will tell you that Navmeshing is a giant pain in the arse, and when doing it on a large scale- it can be. Doing so for three small models is nice and quick.
This may be difficult to explain in text/images, and I will try to get up a Youtube video explaining it as soon as possible. In the meantime, there are lots of video tutorials on Youtube for Skyrim Navmeshing, and the exact same method applies - I particularly like the tutorials by darkfox127
- Find your Static model (not the SCOL) for your level 1 building in the Object Window (I think you know enough now to find them… ok fine, WorldObjects->Static).
- Right-click on it in the Object Window and choose NavMesh Object. This will open your model up in the Render window.
- Rotate your view until you’re looking at an entryway to the building.
- For our purposes, Navmeshing will be done entirely on the floor of the model (Though technically you can do the roof as well if you like), so when I ask you to click and create points, I’m always asking you to do it on the floor.
- Right-click near one of the front corners of the doorway. A small green cube should appear, and the model of the building may no longer be highlighted green - this is normal.

- Now, hold the Ctrl-key and right click in the other front corner. You should now have two green cubes. (If one of them turns a purple color, it means it was deselected, hold your Ctrl key and left-click to select it again)
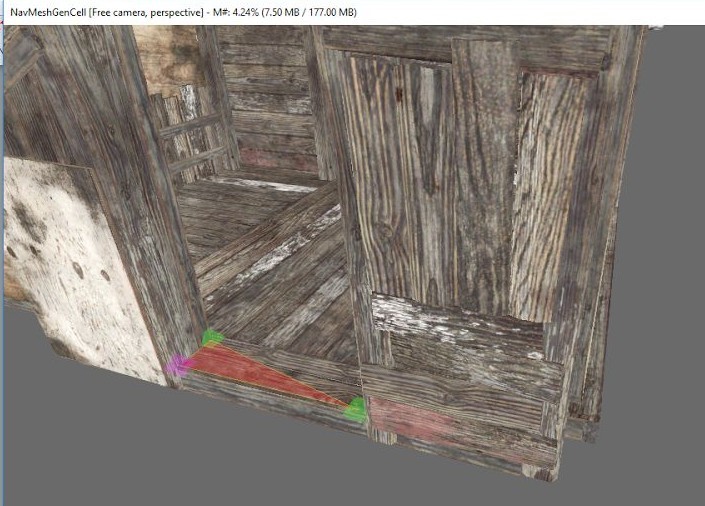
- With the other two selected (highlighted green), Ctrl+Right-Click on the inside of your doorway (see image below). Another cube should appear, as well as a red triangle. Two of your cubes should be selected, and the other unselected.
- Next, Ctrl+Right-Click in the opposite inside point of your doorway, to create another triangle. You should now have a nice rectangle.
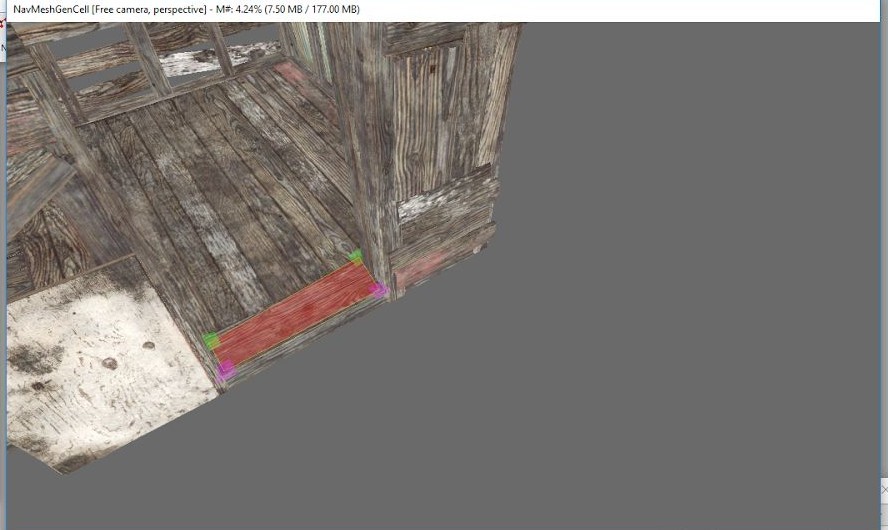
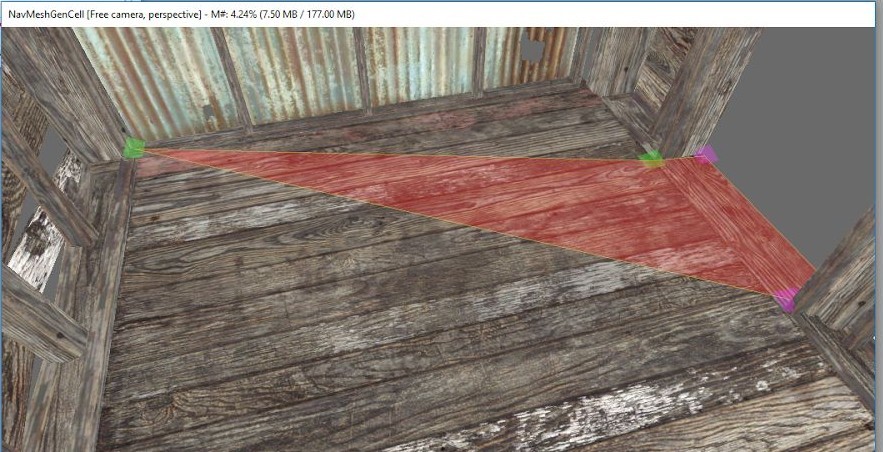
- Continue to follow this pattern around the inside of your building.


Some important tips while working:
- The two green cubes will be connected to the next one you create to form a triangle, so be aware of which two are selected.
- NEVER create triangles overlapping each other, notice how the overlapping piece is bright red (see below). This will cause the NPC to get stuck!
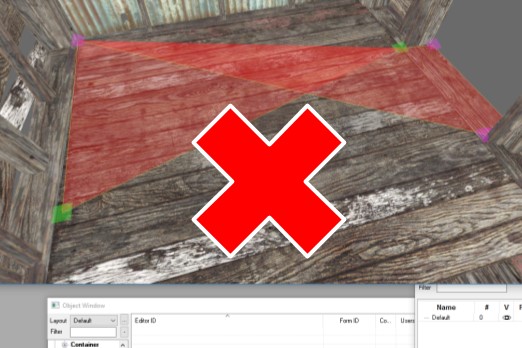
- Instead, change the cubes you have selected so that triangles never cross over each other.

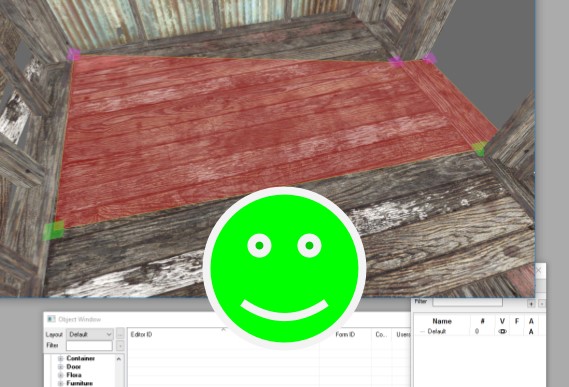
- Do not leave gaps in your NavMesh, the surface should have one continuous Navmesh.
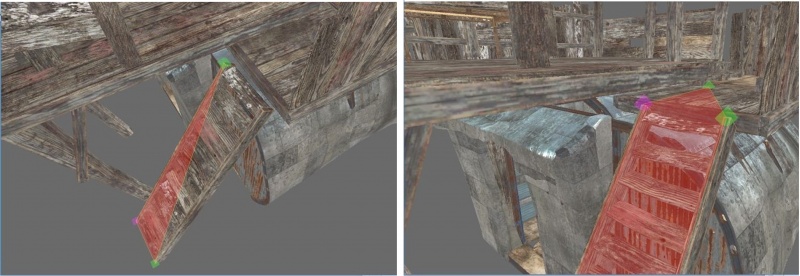
- If you have a second floor, stairs can be a little tricky, they can just cover the entire stairs with two triangles, and when you get to the top, you could continue the upper floor without breaking the Navmesh. I will show you approximately how to do it with some images:
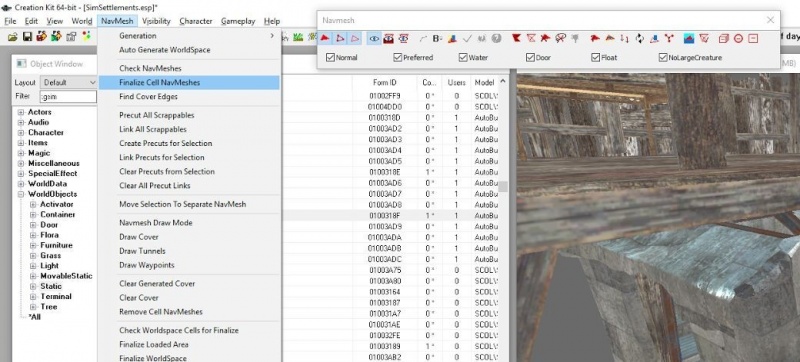
- Once you have your floor and stair surfaces NavMeshed. Click the NavMesh menu at the top and select Finalize Cell NavMeshes. Then close the NavMesh toolbar.
- Save your plugin.


The Navmesh can be difficult to test. It requires that your building is created, then you have to save and exit the game, and load back in before it is even recognized. With two story buildings, the NPCs will sometimes still struggle to navigate.
Hey what’s the big idea kinggath! I checked some of your model NavMeshes and you didn’t follow your own rules! During development, I became convinced that NavMeshes did not work on code created objects. I tested everything I could think of to make them work (you’ll notice some of my model NavMeshes have long “tongues” sticking out the front doors).
It was only when Transfer Settlements was released, that I brought up the issue with cdante (the MA). He was shocked to learn I was correct! He began testing fervantly and finally discovered that exiting the game and coming back in allows the Navmesh to start working again. So props to him for figuring that out!
So my answer is- I just haven’t gotten to it yet. In a future patch, I will correctly follow my own advice and fix the navmesh in all of the Sim Settlement models.
You’re Done!
Your Settlers should now navigate your building with ease (well as best as AI can). If you made it through all of the tutorials, your building is feature complete and ready for release!
The first few will take you a long time, but after a while they become very easy, especially if you sketch some ideas out in advance. I can usually put together a full model with all of the steps in an evening as long as I know what I want it to look like. I find the part that takes the longest is learning what all the different statics look like in the game so you know what to filter for!