Toolkit Chapter 04 Adding Furniture, Clutter, Lights, and More
This tutorial assumes you know basic navigation and keyboard shortcuts to navigate the Creation Kit. If not, please go back and check out the Creation Kit 101 primer.
All of my guides will highlight things that are specific to your experience level: Green for beginners, and Red for seasoned modders. So if you’re new, you aren’t meant to understand the red messages, and if you’re a vet - you can probably skip the green.
Contents
Preamble
Now that you have your building models done and set up in a Building Plan, it’s time to make them interactive and give them some flair!
This will walk you through the steps of adding non-static objects to your building. It will also go into how some of the systems work, so you can be sure to choose the items that will work best within the gameplay of Sim Settlements.
I touched on this briefly in previous tutorials, but I want to reiterate because I’m counting on you guys to help me keep game mechanics functioning.
There is nothing stopping you from adding whatever you want at any level of a building, but the mod works better when the unlocks are consistent. So while you have the power to add Level 3 shop vendors to your L1 residential building, I ask that you please refrain!
In a similar vein, the homes are almost entirely aesthetic, so the payoffs for upgrading them are supposed to be gaining electricity at Level 2, and then lots of decorations at Level 3.
Once you finish this tutorial, you’ll see that there is nothing restricting you from adding whatever you want at any level, so if you feel like adding something to a level will add a lot to it, you can ignore my pleas, but for the most part, try to place things in a way that won’t break the mechanics of Sim Settlements.
The Importance of Making Your Own Forms
As most of you know by now, Sim Settlements requires you to scrap all of your plots before uninstalling - which is a quite a pain. The reason for this is that I failed to consider something when decorating my buildings. I’m going to show you how you can avoid the same pitfall and be sure that your building models will cleanly uninstall for users.
Whenever you find something Bethesda made that you want to add to your building, before you set it up in your Building Plan, first create a Duplicate of it (by right-clicking the form name and choosing Duplicate). Then rename that duplicate by adding your prefix. That way, if your mod is uninstalled, anything Sim Settlements created with it will be removed as well. It also has the benefit of preventing players from Scrapping parts of your buildings!
I still have to go through and do this for all of my buildings and it’s going to be a ton of work. If you get in the habit of doing so now, you’ll never have to think about it again.
Spawned Items - How Sim Settlements Does Its Magic!
Remember how I keep having you work on all of your building models at the 0,0,0 coordinates? Well you’re about to find out why!
Sim Settlements uses complicated math to place your items so that they will always be created in the exact position and rotation you want them to inside of your building model.
In order for this to work, the coordinates you give it have to be relative to 0s. That’s probably confusing, so let’s just do an example!
- Go to the kgSIMBuildingStage cell and remove any SCOLs or models you’ve been working with. All that should be left is the EditorHelper and the concrete blocks down below for catching falling models.
- Use the Object Window and drag your Level 1 building SCOL into the cell and position it at 0,0,0.
- Next go back to the Object Window, and instead of the Static category, click on the Furniture category (make sure you’re in the World Objects -> Furniture category, and not the World Objects-> Statics -> Furniture category).
- Now change the Filter to “kgsim_chair”, this will bring up the chair models I have done the duplication on already (as of this writing, it is only Mama Murphy’s Chair).
- Drag that model into the Cell and position it somewhere in your building. Don’t worry if this is not what you want in your final building, this is just for testing so I can show you how it works and you can do an in-game test to make sure you’ve got it down.
- Once you’ve got it positioned and rotated how you want it, double-click the model to bring up the properties and go to the 3D Data tab. Now slide this window to the upper right corner of your screen so we can come back to it in just a second.
- In the Object Window, expand the Items category, click MiscItem, and then Filter for your Building Plan. Open it.
- Click on SimSettlements:SimBuildingPlan under scripts, and choose Properties.
- Double-click the StageItemSpawns property, and then click Add.
- A new properties window will appear that we are going to start to fill out. Not all of these fields are used for every item, so don’t be intimidated! Due to the way the creation kit works, it will not always show the properties on the next screen in the same order - if you right-click one of the fields, go to Sort Order and select Alphabetical, it will organize the fields.
- Start by double clicking sSpawnName and giving a UNIQUE name to this entry. You can reuse the same name in different building plans, but within this plan, make sure it is unique. In the VIP Stories guide I explain why this is important and show you circumstances where it can actually be useful to use a non-unique name.
- Next, double-click on FormToSpawn. Under Form Type, select Furniture, then Filter to find the object you’re adding (in this case, kgSIM_ChairMamaMurphy). Select it in the Pick Object drop-down.
- Click on iStageNum and enter the stage number of this building level. If you can’t recall, simply press OK, then click on the LevelStops property to find it again. You can then go back to the StageItemSpawns property, double-click the entry you made, and continue where you left off.
- Finally, set the fOffset and fRotation variables to match what’s in the Chair’s property window that we left open and dragged to the corner.
- The rest of the boxes can be left alone; they will be covered in the VIP Stories guide.
- Press OK to finish that entry, then OK again to exit the script properties, then OK a third time to close the Building Plan (You must push OK on these dialogs! If you press the X, the changes you make won’t be saved).
- Close the chair properties we had open and Save your plugin.
You are now ready to test your first spawned object! Load the game and use the testbuildingplan console command, as described in the first tutorial, to skip right to the stage you set the chair to spawn.
This same method can be used just about anything you find in the Creation Kit! You can spawn lights, furniture, people and pets, even object and equipment for the player to loot! The system is completely open and will allow you to do some amazing things!
I did a lot of experimenting to come up with various cool things you can do with this system which are described in the Advanced Possibilities guide.
There are certain types of objects that require special handling to work correctly, which you’ll learn about in the Lights, Power, Motors section.
IMPORTANT NOTE: When filling in the StageSpawnedItems, your objects must be in stage order! To save on processing, the system stops spawning items as soon as it finds one for a different stage.
For example, if you have one of your stage 1 items in this list AFTER a stage 2 item, it will never be spawned.
Decorating the Sim Settlements Way
If you remember in the first tutorial, I advised focusing on the structure, and to not worry about decorations yet. That’s because you can get a lot more bang for your buck out of a building, if you decorate separately.
You can simply duplicate your building plan, and change the StageSpawnedItems property and get an entirely new look and feel!
At this point I also want to talk about tiny clutter.
Can you imagine what a pain the butt it would be to do that StageSpawnedItems thing for every time little decoration you want to place? Typing names, copying numbers, it would take forever, right?
So I’m going to show you a trick for the non-interactive decorations, that will save you a ton of time.
- Going back to our setup from before with your building SCOL centered in the cell. Use the Object Window to place a new AlignmentHelper object (under WorldObjects->Static). And center it in the cell. This will be useful in a bit.
- Next, using various statics, update decorate your building with whatever you’d like. I have already taken hundreds of non-static objects and converted them to statics for you, so you should have tons of objects to work with. They can be found by using the prefix “kgSIM_” in your Filter. There are props, furniture, food objects, etc.
- If you find an object in the Creation Kit or know of something you’ve seen in game, that is not static. You can easily make it a static, I will show you after these steps.
- If you find a Static object that you want to use, you DON’T have to create an extra form like I described in the last section. That only applies to individual objects you want to spawn. Static decorations used in this method we’re working on can be Bethesda forms without causing problems with uninstall or scrapping.
- Once you have your decorations placed how you want them. Hide the SCOL of your building, (to do this, select the model and press the number 1 twice on your keyboard - you can later unhide with Alt+1), you’ll also want to hide the EditorHelpers layer so the utility pole is hidden. At this point all that should be visible are, your decorations, the new AlignmentHelper we created in step one, and the concrete below.
- Drag a box around everything but the concrete.
- Next Ctrl + Click the alignment helper to deselect it, and then Ctrl + click it again to select it once more.
- Yep, you guessed it, we’re making another SCOL!
- Now use Alt+O to create the SCOL, and follow the steps you normally use to create a nif and static. I tend to use a naming scheme like kgSIM_TutorialHouse_L1_Clutter01. The 01 meaning this is my first layout of decorations, so if I want to create an alternate layout I would name it kgSIM_TutorialHouse_L1_Clutter02, etc.
- Note: This is NOT the random clutter system, that has it’s own guide you can check out next.
- Now use the previous section’s steps to add a StageSpawnedItem, but since you used the AlignmentHelper, you don’t have to enter any coordinates or rotation information!
So this method let’s you roll all of your decorations into a single simple model and only require one entry in the StageSpawnedItems system.
What’s even better is that the SCOLs will create custom collision so that when you shoot a glass decoration, it will look and sound like glass, same with metal, wood, etc. Not that you want to shoot up your creation - but it’s the little touches that make your stuff feel alive!
Creating a Static
Creating a static from a non-static object is pretty simple, and usually works flawlessly with the steps below. The one thing to watch out for are animated objects. While you can convert them to statics, their animations may still play, and you won’t be able to use them in SCOLs without causing very strange issues (such as giant green lines all over your screen, or even crashing the CK).
To explain how this works, I’m going to have you convert the Jet model into a static (I’ve already done this, it’s called kgSIM_Prop_Jet, so you won’t need to finish the steps, but I just want a concrete example to show the steps).
- In the Object Window, expand Magic, then click on Potion.
- Filter for “Jet”.
- Double-click the Jet record.
- Find the Model section, and left-drag your mouse over the file path to highlight it.
- Next move your mouse without clicking, so it’s hovered over the highlighted text and hit Ctrl+C to copy the path (the Creation Kit can be very sensitive about where your mouse is, you’ll often have to hover it over fields in order to get Ctrl+C (copy) and Ctrl+V (paste) to work correctly).
- Now that you have the model file path, expand the World Objects category, and click on Static.
- Right-click in the right-half of the window and click New.
- Give the static a unique ID (be sure to use your prefix).
- Click the Edit button in the middle of the window, which will be across from the word Model.
- In the second window that pops up, click in the white box under the words Model File Name, and paste the path you have copied. The model should appear in the preview section.
- Press OK to close the model screen.
- Press OK to save your new form.
You can do this for just about anything. The Model field exists on most objects and can be easily copied and pasted into a static form. The exception is equipment like armor, clothing, and weapons, which are more difficult to create a static from. Creating equipment statics are not covered in this tutorial series, but that information is available on Youtube by other authors, you can also get help doing this on the Sim Settlements Discord server.
The Bed Dilemma
Due to the Realistic Build Times setting, some players will end up with a serious happiness problem during construction stages of Residential plots, as the settler won’t have a bed unless we provide them one.
For the Level 1 construction stages, I just place a sleeping bag in the scaffolding area. You can easily just copy and paste that entry from one of the Sim Settlements default house Building Plans and create an entry for each construction stage. Let me walk you through it:
- Go to Items->MiscItem in the Object Window, then filter for “kgsim_buildingplan”.
- Find the object named “kgSIM_BuildingPlan_HouseSF_SA_03” and open it.
- Why this one? It has the least amount of StagedSpawnItems, so it’s easier to navigate.
- Select SimSettlements:SimBuildingPlan in the scripts section, and open the Properties.
- Click on the StageItemSpawns, now this gets a little tricky, (See the video tutorial on Furniture and Lights if you find this portion tough to follow in text: https://www.youtube.com/playlist?list=PL2g2oK5KhZT0VmyhK62Kvppy3nrGXocbG): See the column labeled “Value”, move your mouse to the left of that word until it turns into a bar with arrows facing left and right, then left-click and drag until you can see more of the data about each entry.

- Now right-click entry 0, and choose Copy Value.
- Why did you just make me do that drag thing, you bastard?! In the future you may want to edit some of your entries and this was as good a time as any to show you to figure out which entry was which - sorry!
- Now go into your building plan, click on StageItemSpawns and Add another entry, when the new property pops up, just click OK. Then find the new entry in your list (by default it will be at the bottom if you didn’t have any other entry selected), right-click on it and choose Paste Value.
- Now move this up the list by selecting it and using the Move Up button on the right so that it’s at the top of your list.
- This entry will be for Stage 1 of your construction.
- Now double-click the entry and set it’s iStageEnd to the number one stage below your level stop. So if your first LevelStop entry is 5, the iStageEnd for this bed should be 4 (since presumably, you already have a bed entry for stage 5).

Job Plots
If your building is one of the job plots, you must use special entries in the StageSpawnedItem property to make them work correctly.
Commercial Plots - Each of the commercial types has three special furniture marker you need to add to your building plan in order for them to function. For each there are a standing version, and a sitting version. They can be found in the Object Window under WorldObjects->Furniture by filtering for “kgsim_marker”. You’ll need to place the L1 version somewhere in your L1 building, the L2 version in your L2 building, and the L3 version in your L3 building. You can mix and match sitting and standing if you like (sitting in L1, standing in L2, etc).
If you’d like to add additional idle animations for your shopkeeper, simply create copies of existing furniture, please contact me and I can show you how to do so.
Industrial Plots - As of the time of this writing, only scrap generating Industrial buildings are supported, but you can absolutely add your own versions of that. In the next major update, I’ll be greatly expanding this system.
To make your industrial plot generate scrap correctly, add one of the kgSIM_ScavengingStation Furniture objects to your StageSpawnedItems.
Agricultural Plots - When placing your crops, do NOT use the Bethesda ones, these will break the assignment code as well as mess with the amount of food provided by farms. There are special versions of each crop which can be found in the Object Window under WorldObjects->Flora and filtering for “kgsim_flora”.
You can add as many as you like, and they will each be harvestable without modifying the food total provided. Try and keep balance in mind by starting slow and adding more to the higher levels of your farm.
If you would like to convert other flora into farmable crops, or add your own new types of flora, check out the Extra - Advanced Possibilities.pdf which has instructions for creating them.
Hey, That’s My Job!
By default, furniture markers are shared by everyone in your settlement. Any NPC can use any furniture they find throughout your settlement (this does not include work objects such as shops or guard towers). For working idles such as farming or welding furniture objects, it doesn’t make a lot sense for anyone to use them.
Here’s an optional set of steps you can do to ensure only the plot owner uses a furniture object.
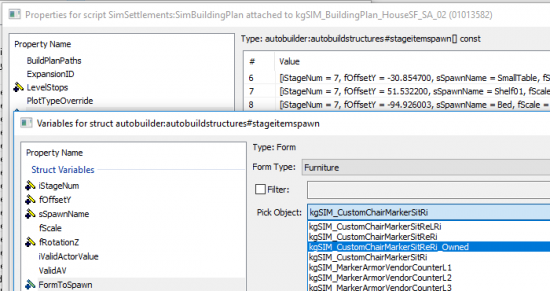
- Start by duplicating your furniture form as described in the earlier section in this tutorial “The Importance of Making Your Own Forms”. It’s even more important that you do so here since we are actually going to edit the form - which you should never do to Bethesda’s forms.
- Be sure to include your personal prefix in the ID, and add _Owned as well so you can distinguish it from any copies you make that don’t need to be owned (for example, furniture for customers to use in a commercial building).
- Open the properties of your _Owned copy of the furniture object and right-click in the Keywords section and press “Add”.
- Filter for “kgsim_force” and add the kgSIM_ForceOwnership keyword.

- Now update your StageSpawnedItem record for this furniture in your building plan so that the FormToSpawn property points to your _Owned copy instead of the copy you made before.


Lights, Power, Motors
One of the most common things you’re going to want to add to your buildings are lights. Lights and other Powered items are a special type of item in Sim Settlements as they are controlled by the Plot itself.
I have already created dozens of different lights (and some powered objects) that are supported by Sim Settlements, you can find them in two categories: WorldObjects->Activators, and WorldObjects->Lights, you can find them by Filtering in the Object Window for “kgsim_powered”
These items are ready to go and will work perfectly in Sim Settlements.
If those are enough for you, then you can use them as is, and you’re good to go!
If you would like to use other lights and powered objects that I haven’t set up yet, read on. This is an advanced topic, that only experienced modders should take on, though if you want to try it yourself, I’d be happy to assist in adding more plot-controlled objects to the system.
If you fail to follow these directions, your items will either stay powered whether or not the Plot has power, or they may never turn on at all! Remember in the first tutorial when you set up your building to automatically inject itself into Sim Settlements?
There were a few lists there that may have been confusing.

These require a bit of trial and error to actually make use of, so I’m going to start by showing you how to convert items to work with the Plots, and then after you test them, you’ll know which list they need to go in. All objects that should be controlled by the plot need a special Keyword applied them: kgSIM_PlotPowered
This keyword, tells Sim Settlements to take control of the electricity on this object. So you can take an existing light or item that you would like to only work if the plot has power, apply that keyword and make a new form for it.
Next, test it in game. Using the steps above for adding StageSpawnedItems, add it to your building plan, and test how it interacts with you turning the power on and off on the plot.
LongPowerUp - If the object seems to play through a flicker animation or turns off and then back on again even when the plot is off, this may be a long power up item. Examples of this are the Vanilla Construction light. If you find one of these, add it to your MyLongPowerUp list and see if that fixes it.
NoActivationRequired - Some items in the game were built in reverse by Bethesda, so that when the code tries to turn them off, they turn on, and vise-versa. Add to the MyNoActivationRequired list if your object seems to work opposite what you’d expect.
AdvancedPowerUp - Certain objects, for example scripted Spotlights, require that an OnActivate event be sent to them in order for them to work. Add to the MyAdvancedPowerUp if your item seems to be functioning oddly and has a script attached to it.
HasMotor - There is a motor script in the game, currently only used by the ceiling fan, but can be adapted to be used by anything you want to spin. To make sure the spinning shuts down with the power, add it to the MyHasMotor list.
Not all items like the plots to take control of their power and may ignore the system at all. This is especially true for light models that aren’t in the workshop system by default. For those you have to add custom nif animations to. I have already done so to handful of objects, and if you’d like to add support for more - I can try and teach you. Though it’s been a while - so we might be re-learning together!
Saving Yourself More Time
It’s very likely, that at some point you’ll want to change the position of something in the future. Maybe you accidentally typed a number wrong in the StageSpawnedItem entry, or just decided you’d rather have a Nuka Quantum bottle instead of Nuka Cola. For this reason, I highly recommend you use the crap out of Layers!
If you take all of this stuff, and stick it on it’s own layer, you can hide it while you’re working on other models, and quickly come back to it at any time!
I completely failed to consider this, so when I want to edit the placement of the VIP stories I have to reverse the entire process, looking at the StageSpawnedItem entries, grabbing the appropriate form, drag it into the cell, and the type all the numbers again. It’s a disaster!
So don’t be a fool like kinggath, save your work on Layers!
If you don’t recall how to add stuff to Layers: Start by creating a new layer in the Layers window, then click on that Layer in the Layers window. Next, select all the items you want to keep safe and choose Add Selection To Layer.
You’re Done!
Once you’ve filled out the StageSpawnedItems property, your house will decorate itself a few seconds after the model displays. In the next guide I’ll show you how to make use of the Randomized Clutter system, even adding in your own sets of clutter!